
Today I’m sharing the rest of the projects I created with the Varied Vases bundle and presented at the Stampin’ Up! On-Stage event in Las Vegas. Here’s my video discussion of all four projects with oodles of tips!
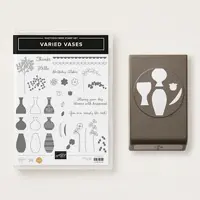
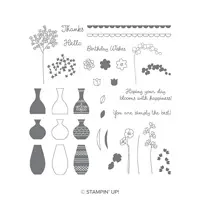
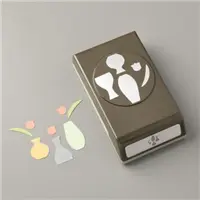
Stampin’ Up! and I collaborated on the design of the Varied Vases Photopolymer stamp set and coordinating Vases Builder Punch as part of my recognition for reaching $1 million in sales last year. I love the modern simplicity of the design. Learn more here.

Images © Stampin’ Up!
The stamp set and punch will be available June 1 when the customer sales period for the Annual Catalog begins. You can save 10% when you purchase them as a coordinating bundle.

STAMPIN’ PRETTY STEP-BY-STEP TUTORIAL #1: Clean & Simple Note Card
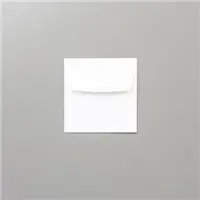
A Stampin’ Up! Whisper White Note Card (Note Cards & Envelopes) was used for the 5″ x 3 1/2″ card base. I love that the note cards are pre-cut, scored and ready to go!
Using a Stamparatus (available June 1) for crisp images and perfect placement, stamp the scallop border, vases and stems (Varied Vases Photopolymer Stamp Set) in Basic Black Archival Ink on Whisper White card stock. Stamp two tulips separately with Basic Black Archival Ink on Whisper White card stock. What is a Stamparatus? Get the full scoop with tips and tutorials here.
Instant Color! Layer the coordinating solid stamp images: Scallop border and tulips in Calypso Coral. Left vase Mango Melody. Center vase Gray Granite. Right vase Highland Heather. Mango Melody, Gray Granite and Highland Heather are all part of the Stampin’ Up! Color Revamp (available June 1). Read about the Color Revamp here.
Punch the two tulips using the Vases Builder Punch and adhere with Mini Stampin’ Dimensionals. Adhere entire layer to card base using Stampin’ Dimensionals.
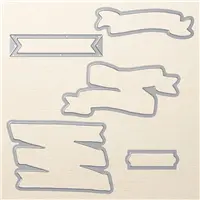
Stamp sentiment in VersaMark Ink on Basic Black card stock. Heat emboss using Heat Tool and White Stampin’ Emboss Powder. Crop using the Big Shot Die-Cutting Machine, Magnetic Platform and a die from Bunch of Banners Framelits Dies. Adhere to card as shown using Mini Stampin’ Dimensionals.

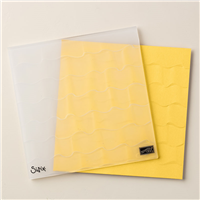
I stepped up this second version (above) with an additional Calypso Coral flower (cut with Paper Snips) for the middle vase and Highland Heather card stock (4 3/4″ x 2 1/4) embossed with the Big Shot Die-Cutting Machine and Ruffled Dynamic Textured Impressions Embossing Folder. A single pearl (Pearl Basic Jewels) dresses up the sentiment.
Enjoy my FREE PDF Step-By-Step Tutorials (and supply list) for the Varied Vases Clean & Simple Note card here.

STAMPIN’ PRETTY STEP-BY-STEP TUTORIAL #2: 3 x 3 Window Minis
I love 3 x 3 cards for gifts or little love notes to tuck inside a lunch box or suitcase. Stampin’ Up! offers the perfect Whisper White mini envelopes for this size!
Using a Stampin’ Trimmer, cut Thick Whisper White card stock to 3″ x 6″. Score at the center (3″) to create a card base.

Stamp line images and solid colors using Varied Vases Photopolymer stamp set. TIP: Rather than stamping directly to the card base, you can stamp on a separate piece of Whisper White card stock and position/crop once you have the window created below. Adhere to card base.
Cut a 2 3/4″ square piece of Whisper White card stock. Crop the center with the Big Shot Die-Cutting Machine and a 1 7/8″ square die from Layering Squares Framelits Dies. Adhere to card base with Stampin’ Dimensionals.

Cut a square of color card stock (Highland Heather, Calypso Coral, Mango Melody) with the 2 1/16″ square die from Stitched Shapes Framelits. To create the frame, center and crop with the same square (Layering Squares Framelits Dies) from above. Adhere to window with Multipurpose Glue applied with a Paper Piercing Tool or toothpick.
Stamp sentiment in VersaMark Ink on Basic Black card stock. Heat emboss using the Stampin’ Up! Heat Tool and White Stampin’ Emboss Powder. Crop using the Big Shot Die-Cutting Machine, Magnetic Platform and a die from Bunch of Banners Framelits Dies. Adhere to card as shown using Mini Stampin’ Dimensionals.
Add a pearl (Pearl Basic Jewels) to the sentiment and flower centers of the orchid. Using Paper Snips, crop the flowers on the Calypso Coral card and adhere them with Mini Stampin’ Dimensionals.

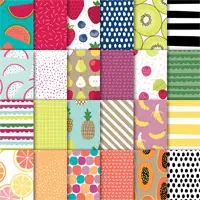
Adhere a pattern from Tutti Frutti Designer Series paper to cover the flap of a 3 x 3 Mini Envelope. Use Paper Snips to carefully remove the excess paper.
Enjoy my FREE PDF Step-By-Step Tutorials (and supply list) for the Varied Vases 3″ x 3″ Window Minis here.

STAMPIN’ PRETTY STEP-BY-STEP TUTORIAL #3: Sunset & Succulents Card
Create a standard 4 1/4″ x 5 1/2″ card base using Stampin’ Up! Thick Whisper White card stock and a Stampin’ Trimmer.
Layer and adhere 3 3/4″ x 1 1/4″ strips of color card stock to build a color block background on the card base. Top to bottom: Highland Heather, Calypso Coral, Mango Melody, Gray Granite.
Crop a stitched square using Whisper White card stock, the Big Shot and Stitched Shapes Framelits Dies (the largest square). Adhere to card base using Stampin’ Dimensionals.

Stamp the three line image vases from Varied Vases Photopolymer Stamp Set in Basic Black Archival Ink on Mango Melody, Gray Granite and Calypso Coral card stock. Stamp the Gray Granite vase with the vase pattern in Gray Granite ink. Crop all three vases with the Vases Builder Punch and adhere with Stampin’ Dimensionals.
Stamp 3 succulent “flowers” from Varied Vases Photopolymer Stamp Set in Basic Black Archival ink on Highland Heather Card Stock. Snip with Paper Snips, assemble and adhere with Mini Stampin’ Dimensionals on left vase.

Stamp five tulip leaves with Basic Black Archival Ink on Lemon Lime Twist card stock. Use the Vases Builder Punch to crop leaves. Assemble and adhere at top of vase.

Stamp two small leaves with Basic Black Archival Ink on Lemon Lime Twist card stock. Use the side of the smallest vase to line up and crop. Assemble and adhere at top of Calypso Coral Vase. For personality, add a pearl to the vase from Pearl Basic Jewels.
Stamp sentiment in VersaMark Ink on Basic Black card stock. Heat emboss using Heat Tool and White Stampin’ Emboss Powder. Crop using the Big Shot Die-Cutting Machine, Magnetic Platform and a die from Bunch of Banners Framelits Dies. Adhere to card as shown.
Enjoy my FREE PDF Step-By-Step Tutorials (and supply list) for the Varied Vases Sweet Succulent Card here.

#4: I previously shared a step-by-step tutorial for the card above here.
HAVE YOU HEARD ALL THE STAMPIN’ UP! PRODUCT NEWS?
- Retiring product and retiring color lists.
- Color Revamp and Ink Pad ReDesign
- How do the NEW Stampin’ Up! colors compare? See my comparison!
- My video “reveal” of new products from the Annual Catalog (part 1).
I love hearing from you! Please leave me your questions or comments about the project for today.

If you enjoyed this post, please be sure to . . .
- Receive a FREE PDF tutorial when you subscribe to my daily blog updates here.
- Click for my Monthly Host Code and how you can earn up to a $50 shopping spree with my Tulip Rewards Loyalty Program.
- Check out the clearance rack and save up to 70%.
- Save 10% on coordinating product bundles!
- The $99 Starter Kit is the best deal of ALL! Discounts & benefits here.
- Visit my gallery for 1000+ paper crafting ideas.
- View my FREE PDF Project Tutorials.
- Follow me on Pinterest.
- Subscribe to my YouTube paper crafting video tutorials.


My project supply list. Click products to shop on-line!


Loved this video! Thank you.
Thank you Mary for a great and easy video. I love that there are so many options and it gives me a lot to share with my stamp class.
Carol Whiting
Rapid City, SD
Thank you, Carol, for your kind feedback! Glad this was helpful!
So happy for your Million Dollar achievement! Love the stamp set and punch! Great Cards! Hugs!
Thanks so much, Debbie. I appreciate your thoughts and comment!
Love all the ideas using your set, so much you can do, really looking forward to getting mine soon, ordered yesterday!
Thanks, Jen. I’m so happy with the interest in the stamp set and bundle. Enjoy when yours arrives!
I didn’t want this until I saw this video. Now, I have to have it!! It’s a super great set!! Thanks for the inspiration and I will so be copying the “Arizona Girl” card! LOVE the colors!!!
Thanks for all of the inspiration, and designing such a fun set!!
The power of a demonstration, right! Thanks, Mary Ann.
I love the bundle and you are still my idol.
Gah! Those are some tall creative shoes, Jennifer!
This is my new favorite stamp set/bundle! And I love the colors, too!
You know how to make a girl smile, Ruby!
I love the clean lines and bright colors. The simplicity of the cards are beautiful.
That means so much. Thank you, Janet!
I have to admit, when I first saw this bundle, I thought, No WAY! Boy, was I wrong? Just watching the video Mary did was an eye opener! What a beautiful bundle! Can’t wait to get it now. I have so much respect for Mary as a person, How could I not get this bundle? So, Thank you, Mary for opening my eyes to the possibilities!
It’s funny what a few fun samples can do to enable all of us! I have such a big wish list from the new catalog and I started out thinking I was going to be on budget!
Beautiful bundle and your designs are just wonderful! I was able to purchase the bundle during the product premiere so can’t wait to play with them. Congratulations to you! Well done!
Lucky you, Carol. I’m so grateful for your feedback!
Love the set and everything you have done with it. I saw the veggies on Pinterest today with a very cute eggplant! It makes my brain spin with possibilities!
Are those veggies adorable, Susan? Unexpected, creative and fun!
Mary Fish, you are absolutely amazing. Your cards are lovely and inspiring. I love that I regularly feel, “Wow, I never would’ve thought of that but I can totally do it.” Looking forward to getting this set.
Blessings,
That is music to my ears: I can totally do it! That’s my goal, Roxanne!
Congratulations on your great bundle of fun! I love sets that let the designer have SO many possibilities to create!
I’m glad you are seeing all the possibilities, Denise!
Pretty sure this is gonna end up being my favorite set in the new catty. I copied your card (the first one with the vases on the shelf) but then I added crystal effects to the yellow and purple vase and let dry over night. Hubba hubba! Such a versatile set. The possibilities are endless. LOVE LOVE LOVE it. Thanks for all the inspiration Mary.
Yeah, baby! I love that idea with Crystal Effects and the full “hubba hubba!”
Hi Mary . . . I am so excited. My pre-order is coming tomorrow and this bundle is in it. I love the shapes and the punch and especially that it is photopolymer. Congratulations on this bundle.
🙂
Marvelous to hear from you, Nancy! How exciting that your bundle is arriving. A great perk of being a demonstrator is getting our hands on new products early!
Congratulations Mary on your hitting a million in sales and the the fabulous new stamp set designed/inspired by you. That’s amazing!
Love these wonderful cards Mary. Those 3”x3” are my favorite I just love your style.
I think I NEED this new stamp set. It’s so versatile!
In case you needed a little more enabling, I just finished a video for tomorrow’s post sharing a few more fun benefits of the stamp set and punch!
I love these Mary! They are so clean and simple yet stunning
Thanks, Wendy. That’s what I strive for!
These are simply amazing, Mary! I love everything about the colors you chose and the designs with this bundle. I can’t wait to play around with this bundle – even though you’ve already set a terribly high bar for beautiful projects.
It’s an easy “bar” for you, BK. Can’t wait to see what you create!
Mary, thank you so much for sharing your creation with the Varied Vases set – when I get my pre-order placed I am definitely going to include that set – your designs are so very cute. Thanks again. Debbie
Thanks for visiting and your kind feedback, Debbie!
Love this bundle, I can’t wait to get it. ☺
That makes my heart happy, Karyn!
Love the new bundle Mary and absolutely love what you have done with it! The bundle is on the top of my wish list. And the Stamperatus is great! I no longer use my piercing mat with my photopolymer stamps. The foam mat on the Stamperatus base leaves me with a perfect image every time.
I think of my Stamparatus as my one and only (and giant) clear block. So convenient and great results!
You are swaying me to this bundle Mary! love the simplicity and your designs! Thanks for the inspiration! Congratulations on your design!
I’m happy to be your enabler, Vicky!
I simply ADORE this set! It looks PERFECT on regular size cards…….but PACKS THE PUNCH on the little 3×3 cards. I am in LOVE!
Thanks, Kadie. That means the world to me!
I am loving this sneak peek of your designs with the new set. How inspiring. These small flowers really fit your personality and make fun, exciting cards. Have a wonderful Monday!
Thanks so much for your continued support and comments, HJ.
Cannot wait to get my Varied Vases. Your samples are so awesome! Your eye for color, perspective, balance and so forth….going to be a great class.
I appreciate your comment, Kimberly, and hope you enjoy the bundle as much as I do!
Just beautiful Mary. Congratulations to you for your part in the design of this very versatile set.
Clean and crisp simplicity with a dash of funk thrown in.
Looking forward to seeing more inspirational designs. It’s definitely at the very top of my wish list when it becomes available June 1st.
Enjoy the accolades coming your way!!
Marianne
Delighted to hear that, Marianne. Love the “dash of funk” reference!