
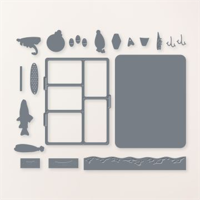
The Gone Fishing die was used to make a shadow box for today’s all occasion card. It’s a perfect example of how to think outside the “tackle” box and open the door for possibilities. Not only do I love this die for today’s flowers, consider birthdays (candles, cupcakes, stars) and Christmas (holly, trees, Santa hat). You get the idea!
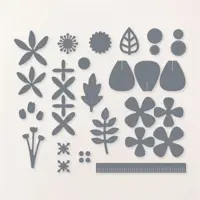
WHAT I LOVE! The Stampin’ Up! Paper Florist dies put you in charge of building beautiful blooms. Choose the colors, petals, leaves, stems and centers and assemble like a floral fashionista!

my simple card tutorial
CUT YOUR CARD STOCK – DIMENSIONS:
- Basic White Thick Card Stock:
- Card Base –4 1/4 x 11, Scored at 5 1/2
- Optional Layer – 4 1/4 x 5 1/2
- Basic White Card Sock
- Interior Sentiment Layer – 4 x 5 1/4
- Berry Burst Card Stock:
- Die-Cut Layer – 4 1/4 x 5 1/2 – Adhered to Foam Adhesive Sheets
- Granny Apple Green Card Stock:
- ALL Die-Cut Stems & Leaves – Scraps
- Daffodil Delight Card Stock –
- Flower Centers & Tulip Petal Die-Cuts – Scraps
- Flirty Flamingo Card Stock, Highland Heather Card Stock, Gorgeous Grape Card Stock , and Azure Afternoon Card Stock –
- Flower Petal Die-Cuts – Scraps

PROJECT TUTORIAL:
Burnish the fold of the Basic White Thick card base with a Bone Folder.
Optional – Crop the Basic White Thick Layer with a Stampin’ Cut & Emboss Machine (Standard) and the Gone Fishing solid tackle box die.
Adhere to the card with Multipurpose Liquid Glue.
Adhere the Berry Burst layer to Foam Adhesive Sheets that have been trimmed-to-size.
Crop with a Stampin’ Cut & Emboss Machine (Standard) and the Gone Fishing tackle box die.
Remove the Foam Adhesive Sheet protective backing and adhere the card as shown.
Use a Stampin’ Cut & Emboss Machine (Standard or Mini)and the Paper Florist dies to crop the petals, flower centers and leaves according to the chart below.

Adhere the flowers, flower centers and leaves together and to the card as shown with Multipurpose Liquid Glue and/or Mini Glue Dots.
Use a Clear Block E to stamp the sentiment (Good Feelings Stamp Set) in Berry Burst Classic Ink onto the Basic White sentiment layer.
Adhere to the interior of the card with Multipurpose Liquid Glue.

POP OF PERSONALITY! Tie a bow of white Baker’s Twine Essentials. Adhere to the tulip stems with a Mini Glue Dot.
stampin’ up! product spotlight!


oh, so pretty card idea!


OH, SO PRETTY! The card above also uses the Paper Florist Dies, but this one is paired with the Basic Borders curved die for a stunning layout! You can see the original blog post, with tips, tricks and project tutorial here.
instant! download current stampin’ up! catalogs
Looking for a quick way to browse the latest Stampin’ Up! catalogs? You can find all current Stampin’ Up! digital catalogs online anytime—perfect for flipping through on your computer, tablet, or phone. From the Annual Catalog to the current Mini Catalog, everything is just a click away and always up to date.
promos, specials, & important updates


don’t forget your tulip rewards!

MY CUSTOMER EXCLUSIVE! Tulip Loyalty Rewards are my way of personally saying thank you to my frequent online shoppers. Earn a tulip for every $50 increment you spend on Stampin’ Up! products (purchased through me). Redeem tulips for a free stamp set (5 tulips) or bundle (10 tulips)!


Oh BEAUITFUL flower card , love the colors , also ♥️
Tfs hugs Frenchie ♥️
Both cards are adorable! Mary, would you ever consider posting pictures of your craft room? I always love how you organize..