
Simple shapes created with the Stampin’ Up! Countryside Corners Dies add modern flair to today’s “sending hugs” card. The seven Countryside Corners Dies are a paper crafter’s essential and layer with perfection and style.
WHAT I LOVE! While Countryside Corners Dies add the foundation, the Stampin’ Up! Layering Leaves stamp set and coordinating Bough Punch add the personality. I love the stylish stems and sentiment!
my simple card tutorial
CUT YOUR CARD STOCK – DIMENSIONS:
- Misty Moonlight Card Stock:
- Card Base – 4 1/4 x 11, scored at 5 1/2
- Die-Cut – 3 1/2 x 2 3/4 (before die-cutting)
- Crumb Cake Card Stock:
- Layer-4 x 5 1/4
- Basic White Card Stock:
- Sentiment Die-Cut – 3 x 1 3/4 (before die-cutting)
- Vellum Card Stock:
- Punched Leaves – 3 x 3 (before cropping)
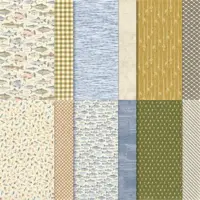
- Let’s Go Fishing Designer Series Paper:
- Die-Cut – 4 x 4 (before die-cutting)
- Envelope Flap – 5 3/4 x 2 1/4

PROJECT TUTORIAL:
Begin by burnishing the fold of the Misty Moonlight card base with a Bone Folder.
Adhere the Crumb Cake layer to the card base with Multipurpose Liquid Glue.
With a Stampin’ Cut & Emboss Machine (Standard), crop the Let’s Go Fishing Designer Series Paper with the 5 x 3 3/8 Countryside Corners die and the Misty Moonlight card stock with the 4 x 2 3/8 Countryside Corners die.
Adhere together with Multipurpose Liquid Glue.
Use a Paper Trimmer to cut to 3 1/2 inches wide.
Wrap with a double layer of Linen Thread, securing with a bow.
Adhere to the card with Stampin’ Dimensionals.

Use a Clear Block D to stamp the two leaves in Misty Moonlight Classic Ink onto Vellum card stock.
Set the ink with a Heat Tool.
Crop with the coordinating Bough Punch.
Adhere to the card as shown with Stampin’ Dimensionals.
Crop the Basic White layer with a Stampin’ Cut & Emboss Machine (Standard or Mini) and the 2 7/8 x 1 1/4 Countryside Corners die.
Use a Paper Trimmer to cut down to 2 1/2 wide as shown.
Use a Clear Block D to stamp the sentiment (Layering Leaves Stamp Set) in Misty Moonlight Classic Ink onto the Basic White die-cut.
Adhere as shown with Stampin’ Dimensionals.
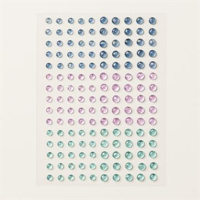
POP OF PERSONALITY! Embellish with a Misty Moonlight Tinsel Gem (Three-Pack).
PERFECT POLISH! Use Multipurpose Liquid Glue to adhere the Designer Series Paper to the outside flap of a Basic White Medium Envelope. You can see my video demonstration with tips on adding designer paper to an envelope flap here.
stampin’ up! product spotlight!


The Layering Leaves Stamp Set and coordinating Bough Punch are part of My Favorite Things from the 2023-2024 Stampin’ Up! Annual Catalog. You can read all about what makes them My Favorite Things here.
oh, so pretty card idea!


OH, SO PRETTY! The card above also uses the Layering Leaves Stamp Set and coordinating Bough Punch from the Stampin’ Up! 2023-2024 Annual Catalog! You can see the original blog post and project tutorial for this card here.
promos, specials, & important updates


don’t forget your tulip rewards!

MY CUSTOMER EXCLUSIVE! Tulip Loyalty Rewards are my way of personally saying thank you to my frequent online shoppers. Earn a tulip for every $50 increment you spend on Stampin’ Up! products (purchased through me). Redeem tulips for a free stamp set (5 tulips) or bundle (10 tulips)!
my project supply list – click products to shop online!


Sale: $10.62
Price: $12.50


I love it so, so much! So smart to cut off the end of these dies for a perfectly chic layout!
Love this card layout! Simply beautiful and elegant.