
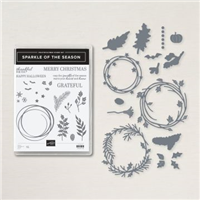
SWIRLS FOR EVERY SEASON! If you are a fan of swirly-themed dies, then I promise the Sparkle of the Season Bundle is FOR YOU! With Fall, Halloween, and Christmas all covered, you get the best bang for your buck with this bundle.
 BUNDLE & SAVE 10%! I love these “seasonal” elements! Purchase the Stampin’ Up! Sparkle of the Season Photopolymer Stamp Set and the coordinating Seasonal Swirl Dies together as a bundle and SAVE 10%! See all the available Stampin’ Up! 10% off bundles in my online store here.

STAMPIN’ PRETTY STEP-BY-STEP TUTORIAL:
Begin with a 4 1/4 x 5 1/2 card base of Very Vanilla Thick card stock.
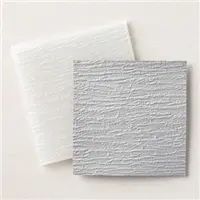
Zip a 3 1/2 x 4 3/4 piece of Very Vanilla card stock through a Stampin’ Cut & Emboss Machine (Standard Only) tucked inside the Bark 3D Embossing Folder.
Adhere to a 3 3/4 x 5 piece of Soft Suede card stock together with Stampin’ Seal and adhere to the card with Stampin’ Dimensionals.
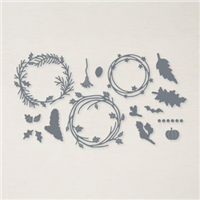
 Use a Stampin’ Cut & Emboss Machine (Mini or Standard) to crop the following colors of card stock:
- Soft Suede: Smallest Stitched Rectangle Die, Fall-themed Seasonal Swirls Die, Sprigs Christmas Cheers Dies.
- Old Olive: Oak Beautiful Leaves Die, Leaves Seasonal Swirls Die
- Pumpkin Pie: Pumpkin and Leaves Seasonal Swirls Die
- Crushed Curry: Leaves Seasonal Swirls Die
- Cherry Cobbler: Oak Beautiful Leaves Die, Leaves Seasonal Swirls Die
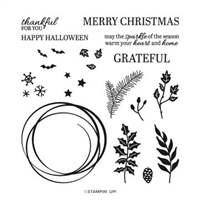
Use a Stamparatus to position and stamp the sentiment in Versamark Ink onto the left-side of the Soft Suede Stitched Rectangle Die.
Cover with White Basics Stampin’ Emboss Powder. Set with a Heat Tool.
Use Paper Snips or a Paper Trimmer to trim to 2″ long.

Adhere the Seasonal Swirls wreath with Multipurpose Liquid Glue.
Position and adhere the sprigs, leaves & pumpkin as shown with Mini Glue Dots and Stampin’ Dimensionals.
Adhere the sentiment with Stampin’ Dimensionals. TIP: Hide the snipped end under a leaf.
Tie a double bow of Crumb Cake Essentials Baker’s Twine. Adhere with a Mini Glue Dot.
POP OF PERSONALITY! Embellish with gold Brushed Metallic Adhesive Backed Dots.
PERFECT POLISH! Crop a 5 3/4 x 2 1/2 piece of Soft Suede Neutrals 6×6 Designer Series paper with a Stampin’ Cut & Emboss Machine (Standard) and the curved Basic Borders Die. Use Multipurpose Liquid Glue to adhere to the outside flap of a Very Vanilla Medium Envelope. Trim the envelope flap to size with Paper Snips. You can see my video demonstration with tips on adding designer paper to an envelope flap here.

Mary


My project supply list. Click products to shop on-line!


Never has there been a more beautiful wreath, Mary! Love this!
I love the projects that you make. I did the Halloween dies with the wreath and it was a total mess. Way to much going on. I love to see yours and the way you do things not so overdone as mine. I appreciate the colors you used it gives me a better idea of what goes together
Mary, what a beautiful card! It is stunning in its simplicity!
Perfectly stunning, beautiful and simple- with lots of layers and textures. You packed a lot of wow into this card!
What a FANTASTIC card my friend. LOVE everything about this card.
Wow! Mary, this is a beauty! I love the pretty little leaves on the wreath. So fallish!!