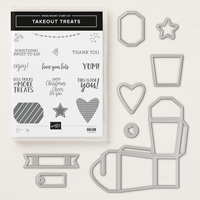
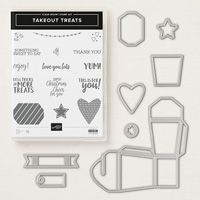
In yesterday’s post here, I shared a sweet Halloween Takeout Treat Box. My WOW! video above offers tips, product possibilities and a demonstration for the Stampin’ Up! Takeout Treats stamp set and coordinating Takeout Thinlits Dies. I used them to make yesterday’s takeout box as well as the one I created below.
 STAMPIN’ PRETTY STEP-BY-STEP TUTORIAL:
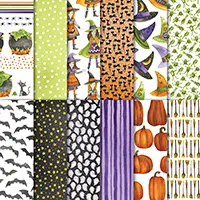
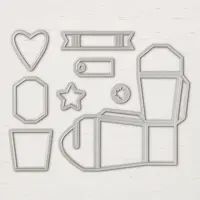
Crop the bat pattern from Toil & Trouble Designer Series Paper twice with the takeout box die from Takeout Thinlits Dies and the Big Shot Die-Cutting Machine. These boxes are simple to assemble because the dies both cut and set score lines during their journey through the Big Shot.

See ALL the new holiday designer paper here and get a FREE coordinating color chart!
Fold and score tab lines of the box with a Bone Folder. Assemble box and adhere the two pieces using Tear & Tape Adhesive. It’s fabulous for 3-D projects.
Crop the octagonal tag from Takeout Thinlits Dies using Gorgeous Grape card stock and the Big Shot. TIP: The octagonal tag from Takeout Thinlits Dies acts as my foundation for all the “decor” on top. Everything is attached to it and the whole thing (including ribbon) slides off and on (like a belly band) for access to the box.
Crop Black Foil card stock with the flagged banner die from Takeout Thinlits Dies. The shiny finish of the Black Foil card stock reminds me of patent leather. Set folds with a Bone Folder and adhere flagged ends diagonally across the octagonal tag with Glue Dots. Add to the top of the takeout box without adhering.

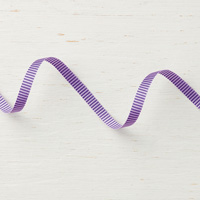
Wrap Gorgeous Grape 3/8 Mini Stripe Ribbon around the box and tie in a bow. Use a Glue Dot to adhere the knot of the bow to the Gorgeous Grape octagon.
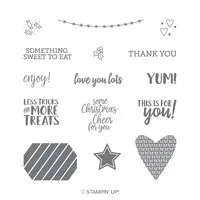
Using the Stampin’ Up! Stamparatus stamp positioning tool for best results, stamp heart image in Tuxedo Black Memento Ink on Lemon Lime Twist card stock. Crop with the heart die from Takeout Thinlits Dies, the Big Shot and the Magnetic Platform to keep the image in place. Adhere the heart to the Black Foil banner.
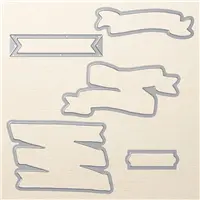
Again using the Stamparatus, stamp “love you lots” from Takeout Treats stamp set in Tuxedo Black Memento Ink on Thick Whisper White card stock. Crop with the Big Shot, Magnetic Platform and banner die from Bunch of Banners Framelits Dies. TIP: Using Thick Whisper White card stock adds a bit more substance to the tag. Add a Gorgeous Grape Glitter Enamel Dot for bling.
Enjoy my FREE PDF Step-By-Step Tutorial (and supply list) for the Takeout Treat Love You Lots Box here.

Save 10% when you purchase the Takeout Treats stamp set and coordinating Takeout Thinlits Dies as a bundle. See ALL Stampin’ Up! 10% off bundles here.
DIE ORGANIZATION TIPS:
The 5 x 7 magnet cards used for my die storage may be purchased with my Stamp-n-Storage affiliate link here. I receive a small affiliate fee when you use my shopping link. However, I can’t say enough about how these products help me stay organized and highly recommend them.
The Totally Tiffany plastic sleeves with index tabs may be purchased here.
I love hearing from you! Please leave me your questions or comments about the project for today.

If you enjoyed this post, please be sure to . . .
- Receive a FREE PDF tutorial when you subscribe to my daily blog updates here.
- Click for my Monthly Host Code and how you can earn up to a $50 shopping spree with my Tulip Rewards Loyalty Program.
- Check out the clearance rack and save up to 70%.
- Save 10% on coordinating product bundles!
- The $99 Starter Kit is the best deal of ALL! Discounts & benefits here.
- Visit my gallery for 1000+ paper crafting ideas.
- View my FREE PDF Project Tutorials.
- Follow me on Pinterest.
- Subscribe to my YouTube paper crafting video tutorials.


My project supply list. Click products to shop on-line!


Love the treat boxes. I just love making them for the different Holidays !
I was totally ignoring this bundle but it is a must have now! Thanks for enabling me Mary!
so many possibilities for year round use, G!
I LOVE all the layers on top the boxes! Thank you for making the video.
Thanks . . . layers of pretty things, Jeannine!
Mary I LOVE this bundle and have really had fun with it … but I learned alot from you today! Thanks for the tutorial Ü. (Love the Totally Tiffany site too!
I’m so excited the video and link to Totally Tiffany was helpful. The plastic sleeves from Totally Tiffany may be on back order but are worth the wait.
Just created a snowman treat box with this very die. I am in LOVE with how you created the ribbon belly band for your treat box. Thanks for all the great tips on creating this treat box.
It’s nice that it can be opened without untying the bow or futzing, Kadie! Can’t wait to see your snowman version.
Even though the die for the takeout box is the star of the show, the added items (tags and shapes) make this a “must-have!” Thanks, Maria
Oh Mary, this little treat box is over the top adorable, what a perfect size for Halloween candy or any other kinds of goodies.
Love how you explain the use of all of these fabulous items to create this super cute little box.
Thank you for sharing.
XO