 This simple but elegant card has lots of easy-to-add texture that gives it the subtle touch it needs.
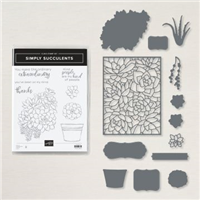
MY FAVORITE THINGS! The Simply Succulents Die Bundle is part of My Favorite Things from the Stampin’ Up! January – June 2021 Mini Catalog. You can see all of my favorite things here.

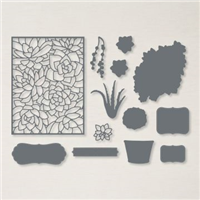
BUNDLE & SAVE 10%! Purchase the Simply Succulents Cling Stamp Set and the coordinating Potted Succulents Dies together as a bundle and SAVE 10%! See all the available Stampin’ Up! 10% off bundles in my online store here.

STAMPIN’ PRETTY STEP-BY-STEP TUTORIAL:
Begin with a 4 1/4 x 5 1/2 card base of Basic Gray card stock.
Use a Stampin’ Cut & Emboss Machine to crop a piece of Petal Pink card stock with the 2 5/8 x 4 Stitched Rectangle Die and a piece of Basic White card stock with the 3 3/8 x 4 3/4 Stitched Rectangle Die.
Zip the cropped piece of Basic White card stock through a Stampin’ Cut & Emboss Machine tucked inside the Subtle 3D Embossing Folder.
Cut the cropped piece of Petal Pink card stock in half on the 2 5/8 end.
Adhere each piece of Petal Pink to the backside of the Basic White as shown with Stampin’ Seal.
Adhere to the card base with Stampin’ Dimensionals.

Use a Stamparatus to stamp the images in Versamark Ink onto a piece of Basic Gray card stock. Cover with White Stampin’ Emboss Powder, tap to remove excess, and set with a Heat Tool.
Use a Stamparatus to stamp the sentiment in Versamark Ink onto a piece of Petal Pink card stock. Cover with White Stampin’ Emboss Powder, tap to remove excess, and set with a Heat Tool.
Crop all with the coordinating Potted Succulents dies and a Stampin’ Cut & Emboss Machine.
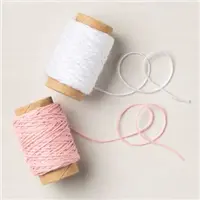
Adhere a bow of White Baker’s Twine as shown with a Mini Glue Dot as shown.
Adhere to the card with Stampin’ Seal and Stampin’ Dimensionals.
POP OF PERSONALITY! Embellish with Petal Pink Elegant Faceted Gems.
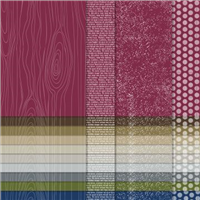
 PERFECT POLISH! Use Multipurpose Liquid Glue to adhere a 2 1/4 x 5 3/4 piece of Basic Gray Neutrals 6×6 Designer Series Paper to the outside flap of a Basic White Medium Envelope. Trim the edges with Paper Snips (if desired). You can see my video demonstration with tips on adding designer paper to an envelope flap here.


STAMPARATUS VIDEO DEMONSTRATION & TIPS LIBRARY
MY STAMPIN’ PRETTY STAMPARATUS VIDEOS
Stampin’ Pretty Stamparatus Tips Part 1: Layer a Sentiment
Stampin’ Pretty Stamparatus Tips Part 2: Emboss in Color
Stampin’ Pretty Stamparatus Tips Part 3: 2-Step Stamping
Stampin’ Pretty Stamparatus Tips Part 4: Magnet Pad
STAMPIN’ UP! STAMPARATUS VIDEOS
Video #2 Aligning with Red Rubber Stamps
Video #3 Creating Patterns with the Hinge-Step Technique
Video #4 Stamping on Pre-Die Cut Pieces
Video #8 Five Must-Know Things

MY MARCH HOST REWARDS CODE IS HERE! SAVE THIS CODE TO EARN TULIP REWARDS!
What are Tulip Rewards? Tulip Rewards are my way of personally saying thank you to my frequent shoppers. You earn a tulip for every $50 increment you spend on Stampin’ Up! products through me and can redeem for up to a $50 shopping spree when you reach 10 tulips. I cover shipping, handling, and tax on your spree, too!
You can see all the details on my EXCLUSIVE Tulip Rewards Program here.
![]()
Mary


My project supply list. Click products to shop on-line!


Such a beauty! Love this!
WOW! What a beautiful card, Mary. So classy! I adore the subtle embossing and the stitching. Beautiful! Thanks for sharing.
LOVE the white embossing on this card.