
Today’s “what makes your soul happy” card features several new products from the 2019-2020 Annual Catalog.
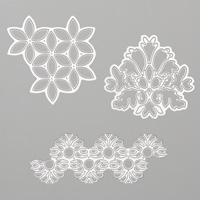
- Tasteful Textures Bundle # 151081
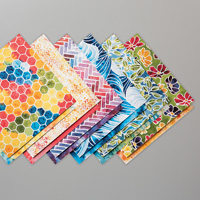
- See a Silhouette Designer Series Paper #149443
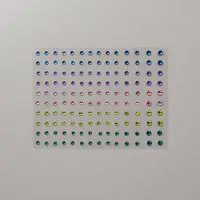
- Noble Peacock Rhinestones #149494


BUNDLE & SAVE 10%! Purchase the Tasteful Textures Cling Stamp Set and the Tasteful Backgrounds Dies together as a bundle and save 10%! Available NOW. See all the current Stampin’ Up! 10% off bundles in my online store here.


The See a Silhouette Designer Series Paper and Noble Peacock Rhinestones are part of My Favorite Things from the 2019-2020 Annual Catalog. You can see all My Favorite Things on my blog page here.

STAMPIN’ PRETTY STEP-BY-STEP TUTORIAL:
Begin with a 4 1/4 x 5 1/2 card base of Whisper White card stock.
Layer and adhere 4 1/2 x 3 1/2 piece of See a Silhouette Designer Series Paper to a 4 3/4 x 3 3/4 piece of Whisper White card stock with Snail Adhesive. Adhere to the card base with Stampin’ Dimensionals.

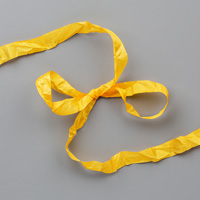
Zip a 2 3/4 x 3 1/2 piece of Whisper White card stock through a die-cutting machine with the die from the Tasteful Backgrounds Dies, positioned in the lower left corner. Wrap a piece of Crushed Curry 3/8″ Crinkled Seam Binding Ribbon about 1/4″ from the top, securing in the back with Snail Adhesive.
Use the Stamparatus to position and stamp the sentiment in Mango Melody ink onto a piece of Whisper White card stock that has been cropped with the 2 1/2 x 3 heart die (Stitched Be Mine Dies). Adhere as shown with Stampin’ Dimensionals.
Create a bow of Crushed Curry 3/8″ Crinkled Seam Binding Ribbon and adhere to the heart with a Mini Glue Dot.

POP OF PERSONALITY! Add 8 Blueberry Bushel Royal Peacock Rhinestones to the card as shown.
Use Multipurpose Liquid Glue to adhere a 2 1/4 x 5 3/4 piece of See a Silhouette Designer Series Paper to the outside flap of a Medium Whisper White Envelope. Trim to size with Paper Snips. You can see my video demonstration with tips on adding designer paper to an envelope flap here.
 OH, SO PRETTY! The Stitched Be Mine Dies are perfect for layering and piecing together multiple hearts. You can learn more about this friend card (below) that I shared previously, along with instructions and a supply list here.

I love hearing from you! Please leave me your questions or comments about the project for today.

If you enjoyed this post, please be sure to . . .
- Receive a FREE PDF tutorial when you subscribe to my daily blog updates here.
- Click for my Monthly Host Code and how you can earn up to a $50 shopping spree with my Tulip Rewards Loyalty Program.
- Check out the clearance rack and save up to 70%.
- Save 10% on coordinating product bundles!
- The $99 Starter Kit is the best deal of ALL! Discounts & benefits here.
- Visit my gallery for 1000+ paper crafting ideas.
- View my FREE PDF Project Tutorials.
- Follow me on Pinterest.
- Subscribe to my YouTube paper crafting video tutorials.


My project supply list. Click products to shop on-line!


I LOVE your cards!! and MISSED getting that paper – it’s gorgeous!! May I teach that card to 4 of my friends?
Always feel free to CASE! Download the PDF tutorial to make it easy peasy.
My favorite way of adding texture is to use embossing folders and then to apply a little color lightly on top with a sponge or brush to enrich the embossed design.
Love, love, love the unconventional colors and all the wonderful layers, each one adding another layer to the beautiful card.
My favorite way to add texture to my cards is heat embossing, not only because it raises the heat embossed item up but because of all the gorgeous embossing powders available.
Such a happy card!
Love the friendship card of hearts. That’s a wow card to me!! Another ARTISTIC FROM MARY, THANK YOU, CMT.
This is such a beautiful card! Love the designer paper!
Lovely best friends card. Well worth the extra work. Thanks for sharing.
NO flaws in this card! it’s stunning & thanks for sharing, Mary.
Another bundle I skipped right over in the catalog and now must have! What a great use of color and embellishments, Mary. Love the layout, the DSP is perfect. (I did grab that right away!) Thanks for showing the potential for this bundle!
gorgeous! the type of card I like to make! May I case your card for a makeNtake at a scrapbooking event that I have in July?
Always feel free to CASE! Download the PDF tutorial to make it easy peasy.
Oooooooh, MY , ABSOLUTELY BEAUTIFUL,
WOW
TFS MsMary ♥️
I was so surprised when I read that the DSP was your background, I thought it was water colored by you and it is gorgeous. Your card is a true work of art. Using the negative of the die is genius.
The second card is outstanding, I LOVE the colors. TFS.
Love this sentiment, love this layout, love this paper! ♥
I love the two cards on your e-mail today. I have the paper with the Brusho background and i love the flower cut outs on this card, so I have to add that bundle to my list. The crumb cake and mint green heart card is so soft and elegant looking. I would have never thought to put crumb cake and that light green together, but it’s very pretty together. Thank you for sharing your talents with all of us, Mary.
I wasn’t totally sold on this stamp set on my first time through the catalog, but those dies! Such a pretty card. Anyone who would get this card in the mail would smile from ear to ear!
Gorgeous card Mary
You NAILED this gorgeous looking card my friend.
Love this bright and beautiful card, Mary. At first look, I thought you had watercolored the background, but no, it’s much easier using this beautiful DSP. It’s such a fun card. Enjoy your day!
Stunning, Mary! Beautiful card and I love the sentiment.
This is a Beauty! So unusual but truly a Stunner!
Mary, You have done it again! I had not considered those stamp sets and now I want them after seeing your designs! I envy your creativity. Thanks for the inspiration. I hope Stampin”Up! Appreciates all of you who make their products POP. Thanks again for sharing.
Geourgus !!! Super are these from the catalogus, I love these the nost wiht paper too ! Greetings, from now independed demo in Holland, hugs from me, Tina.
Gorgeous Mary!!! The pattern paper behind your die cut panel, which is also amazing, is simply beautiful!!
Love how you framed this awesome sentiment and the sweet little bow detail.
Thank you for sharing.
XO
Love the cards! Beautiful!