
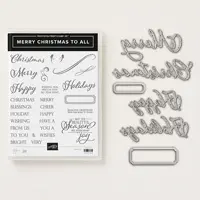
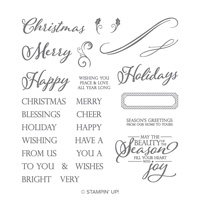
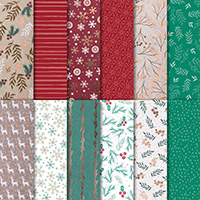
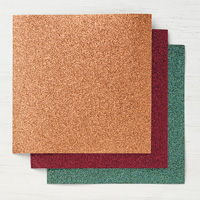
Today’s holiday card highlights the Merry Christmas to All bundle from the Stampin’ Up! Holiday Catalog. It also showcases the Joyous Noel Specialty Designer Series Paper and 6×6 Glimmer Paper. Keepin’ it simple – This is a CASE with a few tweaks of a card from Stampin’ Success Magazine – a demonstrator resource..
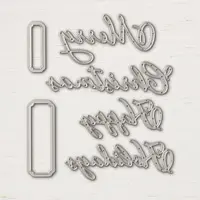
SAVE 10% when you purchase the Merry Christmas to All stamp set and Merry Christmas Thinlits Dies as a coordinating bundle. The bundle is on the list of My Favorite Things from the Stampin’ Up! Holiday Catalog.

STAMPIN’ PRETTY STEP-BY-STEP TUTORIAL:
Create a 4 1/4 x 5 1/2 card base using Gray Granite card stock and the Stampin’ Trimmer.
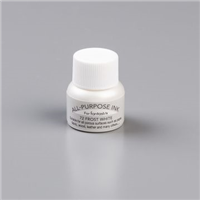
Add Frost White shimmer paint to the small filigree stamp with a Sponge Dauber and randomly stamp on the card base.
TIP: Here’s a bit of general information about using Shimmer Paint.
- Shake the container before each use.
- After shaking the container, use a Sponge Dauber to lift paint from the cap and apply it to the stamp.
- If applied to a stamp, wash the paint off as soon as possible with water and a mild detergent. Then use Stampin’ Mist® to condition the stamp.

Cut a piece of Joyous Noel Specialty Designer Series Paper with the largest Stitched Shape Circle Framelit Die using the Big Shot. Adhere to the card base with Stampin’ Dimensionals.

Using the Big Shot and the “Holidays” die from Merry Christmas Thinlits Dies, cut a piece of Tranquil Tide Joyous Noel Glimmer Paper. Adhere as shown with small amounts of Snail Adhesive.
Cut a 2 3/4 piece of Gray Granite 1/2″ Texture Weave Ribbon. Adhere with Snail Adhesive.

Cut a piece of Gray Granite card stock with the large label die from the Merry Christmas Thinlits Dies. Stamp the holly leaf in Tranquil Tide ink and the “HAPPY” sentiment in Merry Merlot ink. Adhere with Stampin’ Dimensionals.
Add a touch of bling with three Stampin’ Up! self-adhesive Frosted Epoxy Droplets.

Here is a card I created previously using the Merry Christmas Thinlits Dies. Details, supply list and a FREE PDF tutorial here.


BE READY ON OCT. 8 AT 12:01 A.M. MT! Paper Pumpkin has a LIMITED NUMBER of October Paper Pumpkin kits to offer at this special introductory rate of $5 for first time subscribers! The flash sale begins on Oct. 8 at 12:01 a.m MT and will end October 10 OR when the kits sell out (whichever is first). My bet is they will sell out quickly at this $5 price so BE READY to subscribe on Oct. 8!
IMPORTANT: Enter the code FLASH1018 before the sale ends to receive this special introductory price.
HOW IT WORKS
- The flash promotion price for new month-to-month subscribers is $5 (USD).
- The flash promotion starts October 8, 2018 at 12:01 a.m. MT.
- To subscribe to Paper Pumpkin at the flash sale price through me, click here.
- Enter the code FLASH1018 before the sale ends to receive this special introductory price.
- The sale will continue until supplies of the kit run out or the October subscription period ends on October 10, whichever comes first.
- If the supply runs out before October 10, sale will end and Stampin’ Up! will automatically begin accepting new subscribers for November’s kit (which features a one-of-a-kind, exclusive holiday kit in a specially-designed box).
- Discount applied to one kit per month for the first month of a new subscription. After the first month, the price for the subscription will return to $19.95.

WOULD YOU LIKE ALTERNATE IDEAS & FREE TUTORIALS FOR YOUR PAPER PUMPKIN KITS? Click here to learn about my Stampin’ Pretty Paper Pumpkin Club.


I love hearing from you! Please leave me your questions or comments about the project for today.

If you enjoyed this post, please be sure to . . .
- Receive a FREE PDF tutorial when you subscribe to my daily blog updates here.
- Click for my Monthly Host Code and how you can earn up to a $50 shopping spree with my Tulip Rewards Loyalty Program.
- Check out the clearance rack and save up to 70%.
- Save 10% on coordinating product bundles!
- The $99 Starter Kit is the best deal of ALL! Discounts & benefits here.
- Visit my gallery for 1000+ paper crafting ideas.
- View my FREE PDF Project Tutorials.
- Follow me on Pinterest.
- Subscribe to my YouTube paper crafting video tutorials.


My project supply list. Click products to shop on-line!


So pretty and so elegant!
You’re wonderful. It’s a CASE but sometimes recreating something beautiful is fun, too!
Oh MsMary, I love the flakes and how you did the Merry, so wintery, it’s just all pretty ♥️
Tfs
Hugs Frenchie
Thanks, Frenchie. Stampin’ Up! gets credit for the design . . . this one caught my eye and captured my artistic heart!
This card is a real SHOW STOPPER. SO MUCH PRETTY to look at…..And done in your CLEAN AND CLASSIC style. Thanks for sharing.
Love the shimmer paint background and the DSP with the strip of Gray Granite ribbon under the glittery Holidays. So pretty! Have a great day, Mary.
Thanks for stopping by, Hilda!
CASE-ing a card can be true love!
The colors and movement of this card are great. The swirling of the background and the word “Holiday” makes this truly feel like winter. TFS.
Thanks, Juanita. Your comments brighten each day a little more!
I’m so glad you enjoyed the card, Nancy!
Perfect card, Mary. Love the metallic Holidays!
Have a blessed day.
🙂