Welcome to the Stampin’ Pretty Pals’ Blog Hop!
This month, the theme is See How My Garden Grows. We hope that you will be inspired by the creations the Pals are sharing with you! You will find the lineup at the end of my post to help you “hop” along from Pal to Pal.

WHAT I LOVE! A Great Deal on My Favorite Things! Here’s a list of the retiring products I used on today’s card along with their discounts. Please note that products and discounted prices are only while supplies and are at risk for selling out.
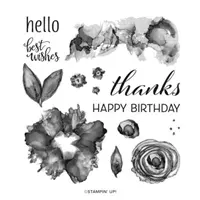
- Artistically Inked Stamp Set – Item 154542 – Reg. $24
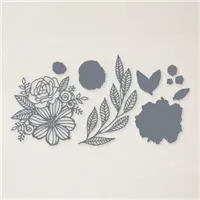
- Artistic Dies – Item 155371 – SAVE 50% – NOW $17.50
- Stitched with Whimsy Dies – Item 155314 – SAVE 40% – NOW $17.40
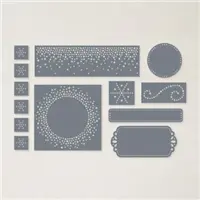
- Labels Aglow Dies – Item 159551 – SAVE 50% – NOW $16.50
- Simply Elegant Trim – Item 155766 – Reg. $7.50
- Festive Pearls – Item 159963 – SAVE 30% – NOW $4.90
- Brights 6 x 6 Designer Series Paper – Item 161643 – SAVE 10% – NOW $11.25
- Basic Borders Dies – Item 155558 – SAVE 40% – NOW $17.40
my simple card tutorial
CUT YOUR CARD STOCK – DIMENSIONS:
- Poppy Parade Card Stock:
- Card Base – 5 1/2 x 8 1/2, scored at 4 1/4
- Granny Apple Green Card Stock:
- Layer – 5 1/4 x 4
- Basic White Card Stock:
- Die-Cut Layer – 5 x 3 3/4
- Stamped & Die-Cut Flowers – 6 x 2 (before die-cutting)
- Stamped & Die-Cut Leaves – 5 x 2 (before die-cutting)
- Stamped & Die-Cut Sentiment- 4 1/4 x 1 1/4 (before die-cutting)
- Brights (Poppy Parade) 6×6 Designer Series Paper:
- Envelope Flap: – 5 3/4 x 2 1/4 (before die-cutting)

PROJECT TUTORIAL:
Begin by burnishing the fold of the Poppy Parade card base with a Bone Folder.
Adhere the Granny Apple Green card stock layer to the card base with Multipurpose Liquid Glue.
Zip the Basic White layer through a Stampin’ Cut & Emboss Machine with the largest Stitched with Whimsy Die.
Use a Clear Block or Mini MISTI to stamp the 3 flowers (Poppy Parade Classic Ink) and 3 leaves (Granny Apple Green Classic Ink) (Artistically Inked Stamp Set) onto the Basic White layers.
Crop with a Stampin’ Cut & Emboss Machine (Standard or Mini) and the coordinating Artistic Dies.


GET 100+ CARD SKETCH IDEAS FREE! Subscribe to my email updates & instantly receive a FREE digital gift of 100+ Card Sketch Ideas that you can save or print! Subscribers also receive my daily card ideas and tutorials, special offers, new product releases and exclusive “subscriber-only” resources.
Adhere the flowers and leaves to the card with Multipurpose Liquid Glue (middle flower and both double leaves) and Stampin’ Dimensionals (remaining 2 flowers and single leaf).
Use a Mini MISTI to stamp the sentiment (Artistically Inked Stamp Set) in Tuxedo Black Memento Ink onto the Basic White layer.
Crop with a Stampin’ Cut & Emboss Machine (Standard or Mini) and the Labels Aglow die.
Thread silver Simply Elegant Trim through the ends of the sentiment die-cut and around the Basic White layer, securing on the left with a bow.
Adhere as shown with Stampin’ Dimensionals.

POP OF PERSONALITY! Embellish the center of each flower with 3 silver Festive Pearls.
PERFECT POLISH! Adhere the 5 3/4 x 2 1/4 Designer Series Paper (DSP) to the Basic White Medium envelope flap with Multipurpose Liquid Glue. IMPORTANT: Add glue to the flap first, not the DSP. Center and line up the Basic Borders scalloped edge die, tape to secure (Post-It Tape) and crop with a Stampin’ Cut & Emboss Machine (Standard). Watch my Pretty Envelope Flap WOW! video for a quick demonstration here.

More inspiration awaits, so use the lineup below to visit the rest of the Design Team. Please mark your calendars for our next blog hop on May 8, when our theme will be Fun Family Occasions.
Until then, have fun in your craft space.
Stampin’ Pretty Pals Blog Hop Line-Up:
- Mary Fish at Stampin’ Pretty
- Deb Walker at Deb Stamps Life
- Mary Hanson at Up North Stampin’
- Windy Ellard at Windy’s Wonderful Creations
- Debbie Crowley at expressively deb…
- Beth McCullough at Stamping Mom
- Su Mohr at Aromas And Art
- Sue Jackson at Just Peachy Stamping
- Peggy Noe at Pretty Paper Cards
- Rae Burnet at Wild West Paper Arts
- Melissa Seplowitz at The Stamping Ninja
- Tricia Chuba at ButterDish Designs
- Debbie Mageed at Secrets to Stamping
- Stesha Bloodhart at Stampin’ Hoot!
- Karen Hallam at Karen’s Stamping Habit
- Pamela Sadler at Stampin Pink Rose
oh, so pretty card idea!


OH, SO PRETTY! Enjoy this “hello” card also showcasing the RETIRING Artistically Inked Stamp Set and Artistic Dies! You can see the original blog post and project tutorial for this card here.
promos, specials, & important updates


don’t forget your tulip rewards!

MY CUSTOMER EXCLUSIVE! Tulip Loyalty Rewards are my way of personally saying thank you to my frequent online shoppers. Earn a tulip for every $50 increment you spend on Stampin’ Up! products (purchased through me). Redeem tulips for a free stamp set (5 tulips) or bundle (10 tulips)!