
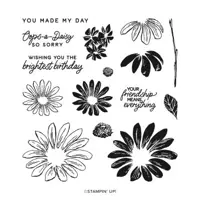
The Cheerful Daisies bundle may be the “belle of the ball” in the new Stampin’ Up! 2023-2024 Annual Catalog. It made the list of My Favorite Things because of it’s “fresh picked” creativity and tasteful style. The bundle is currently on backorder with an estimated restock of the week of July 3!
WHAT I LOVE! Does yummy texture speak to you as much as it speaks to me? The Basics 3D Embossing Folders are a Stampin’ Up! On-Line Exclusive and this background pattern goes straight to WOW for impact!

The cheery combination of Pebbled Path, Azure Afternoon, and Lemon Lolly (all new Stampin’ Up! Colors) was shared on my Tuesday post along with other color combos here.

my simple card tutorial
CUT YOUR CARD STOCK – DIMENSIONS:
- Pebbled Path Card Stock:
- Card Base – 5 1/2 x 8 1/2, scored at 4 1/4
- Die-Cut Flowers – 4 x 3 (before die-cutting)
- Die-cut Flag – 1 1/2 x 2 1/4 (before die-cutting)
- Azure Afternoon Card Stock:
- Layer – 5 1/4 x 4
- Basic White Card Stock:
- Embossed Layer – 4 3/4 x 3 1/2
- Die-Cut Flowers – 4 x 3 (before die-cutting)
- Stamped & Die-Cut Leaves & Flower Centers – 3 x 3(before die-cutting)
- Lemon Lolly Card Stock:
- Die-Cut Flowers – 4 x 3 (before die-cutting)
- Brights 6 x 6 Designer Series Paper:
- Envelope Flap – 5 3/4 x 2 1/4

PROJECT TUTORIAL:
Begin by burnishing the fold of the Pebbled Path card base with a Bone Folder.
Adhere the Azure Afternoon layer to the card base with Stampin’ Dimensionals.
Zip the Basic White layer through a Stampin’ Cut & Emboss Machine tucked inside the crosshatch Basics 3D Embossing Folder.
Adhere to the card with Multipurpose Liquid Glue.
Stamp the flower centers (1 large & 2 small) and leaves (4) in Pebbled Path Classic Ink onto Basic White layer.
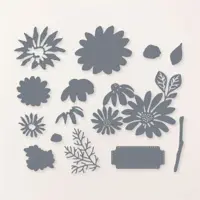
Use a Stampin’ Cut & Emboss Machine (Standard or Mini) to crop the following:
- Pebbled Path – Flagged Label – Nested Essentials Die, Bottom Daisy Layers – Cheerful Daisies Dies
- Basic White – Connected Daisies – Cheerful Daisies Die -(snip the leaves off the large daisy)
- Lemon Lolly – Detailed Daisy Leaves – Cheerful Daisies Dies
- Stamped Leaves & Large Flower Center – Coordinating Cheerful Daisies Dies

Snip the two smaller flower centers closely with Paper Snips.
Adhere all daisy pieces together as shown with Multipurpose Liquid Glue.
Adhere all pieces to the card and the flower centers to daisies as shown with Stampin’ Dimensionals.
Rub the Pebbled Path flagged die-cut with an Embossing Buddy.
Use masking paper to mask and stamp the sentiment in Versamark Ink as shown.
Cover with white Stampin’ Emboss Powder, set with a Heat Tool.
POP OF PERSONALITY! Embellish with Pebbled Path 2023-2025 In Color Dots.
PERFECT POLISH! Use Multipurpose Liquid Glue to adhere the Designer Series Paper to the outside flap of a Basic White Medium Envelope. You can see my video demonstration with tips on adding designer paper to an envelope flap here.


MY FAVORITE THINGS! The sentiment flag was cropped using the Nested Essentials Dies, part of My Favorite Things from the 2023-2024 Stampin’ Up! Annual Catalog. You can see My Favorite Things here.

be a part of something special!
I have the privilege of leading a welcoming, nationwide community of over 700 paper crafting enthusiasts. I support them with daily communication, kindness and a whole lotta paper crafting inspiration, prizes and fun! Your card making confidence will bloom and you’ll fit right in to this artistic, friendly and positive environment.
You’ll never be pressured to sell or build a business! THIS IS ABOUT YOU!
Mary


My project supply list. Click products to shop on-line!


Such sweet layering! I love the mix of Lemon Lolly, Azure Afternoon and Pebbled Path – striking! Such a sweet bouquet!