
GET YOURS NOW! Starting today, November 3, the Curvy Celebrations products are available for customer purchase! The card above showcases just one of the Curvy Dies paired with the Brushed Metallic card stock, So Many Snowflake Dies, and the Winter Snow Embossing Folder.

The Curvy Celebrations products consist of the following:
- Quite Curvy Variety Bundle | Item 158396 | $70.50
- This option contains all options available with this promotion at a 10% discount
- Quite Curvy Stamp Set
- Curvy Dies
- Curvy Christmas Stamp Set
- Classic Christmas 6×6 Designer Series Paper
- This option contains all options available with this promotion at a 10% discount
 The Christmas themed options are limited release items and only available through January 4, 2021, or While Supplies Last.
- Curvy Christmas Stamp Set | Item 155364 | $21.00
- Classic Christmas 6×6 Designer Series Paper | Item 155969 | $11.50

The Quite Curvy Bundle shown below will be featured in the January – June 2021 Mini Catalog but is available now as an early release. NOTE: These items cannot be purchased individually.
- Quite Curvy Bundle | Item 156228 | $41.25
 STAMPIN’ PRETTY STEP-BY-STEP TUTORIAL:
Begin with a 4 1/4 x 5 1/2 card base of Whisper White Thick card stock.
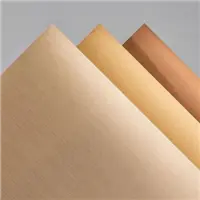
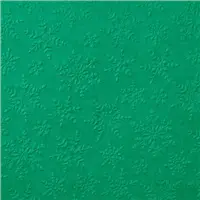
Zip a 4 1/4 x 5 1/2 piece of Brushed Metallic Bronze card stock through a Stampin’ Cut & Emboss Machine tucked inside the Winter Snow Embossing Folder.
Adhere to the card base with Stampin’ Seal.
Use the Curvy Die and a Stampin’ Cut & Emboss Machine to crop a 4 1/4 x 5 1/2 piece of Brushed Metallic Copper card stock and 3 1/4 x 4 1/2 piece of Brushed Metallic Bronze card stock.
COOL TIP: To keep your Brushed Metallic card stock clean, use a relatively new top plate (#3), as well as a piece of copy paper to protect it from unwanted marks when running through the Stampin’ Cut & Emboss Machine.
 Adhere the curvy die-cuts together and to the card base as shown with Stampin’ Dimensionals.
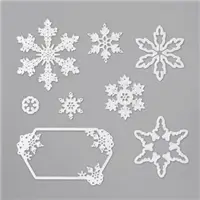
Use the So Many Snowflakes Dies to crop the snowflakes from Brushed Metallic Copper card stock.
Adhere as shown with Multipurpose Liquid Glue.
Trim the snowflakes to meet the edge of the card with Paper Snips.

Use a Stampin’ Cut & Emboss Machine along with the Joy Dies to crop a piece of Whisper White card stock and a piece of Brushed Metallic Copper card stock that has been adhered to a Foam Adhesive Sheet.
Remove the adhesive backing and adhere together.
Adhere to the card as shown with Multipurpose Liquid Glue.

OH, SO PRETTY! Enjoy a few other samples shared by Stampin’ Up! and myself using products from the Curvy Celebrations promotion.


SAVE THIS NEW NOVEMBER CODE TO EARN TULIP REWARDS!
What are Tulip Rewards? Tulip Rewards are my way of personally saying thank you to my frequent shoppers. You earn a tulip for every $50 increment you spend on Stampin’ Up! products through me and can redeem for up to a $50 shopping spree when you reach 10 tulips. I cover shipping, handling, and tax on your spree, too!
You can see all the details on my EXCLUSIVE Tulip Rewards Program here.
Mary


My project supply list. Click products to shop on-line!


Good Day. It has been on year I gave been asking several demonstrators to show me how to put this card together. I spoke to Jan B, TX Stampin but to no avail. This morning I spoke to Iced Images and she directed me to your youtube channel. Is it possible if you can do a video showing how it is being done. Thank you
Hi Annabella,
I am sorry, but I no longer have these products to do a demonstration with. They have retired and I have sold my dies. Can you please let me know what part you are struggling to understand? I may be able to help explain in more detail, I just cannot show you. Mary
I am struggling with how to layer the pieces. It has me confused
Hi Annabella,
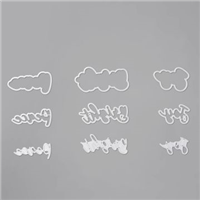
You have two different size pieces. I have it diagramed here. The dotted lines are the curvy die. Each piece will be run through the machine twice to get the two pieces you need for the layers on the card.
Does this make sense?
OH Mary! You always create such high standard cards but this one is exceptional! Love it! Thank you also for the free tutorial! How generous ?
I just have one question….do you have any tips on how to get the same curve on the pieces that go on top? Many thanks, Leanne
Hi, Mary! Just wondering if I can buy the curvy dies by themselves? Thanks! Hope you’re doing well and have avoided the virus! I’m guessing those fires never got too close, either!
Stay safe! Bonnie
Mary, your Curvy Celebration card is exquisite. Now I’m gonna hey this bundle!
cette carte est sublime
WHAT!!!!!! Now that is just drop dead gorgeous!
Mary, this goes above and beyond your usual amazing. I have no words. Can’t wait to paly with this terrific set. Thanks for the over-the-top design inspiration.
Stunning card! I can’t wait to try this. TYFS, Mary.
Gorgeous card, so shiny and elegant. Love the curvy dies and pretty snowflakes. Thanks for sharing.
Beautiful card Mary! So unique.
Gasp! What an undeniable beauty! This is an incredible showcase of this new bundle, Mary! Stunner!
Oooh, MsMary , it’s passed BEAUITFUL, WAY OVER THE PARK, …..
I LOVE IT , who ever receives that CARD will be soooooooooo, in love with it …. she need to fram that one ♥️♥️♥️♥️
Tfs hugs Frenchie ♥️♥️♥️♥️
WOW my friend. AWESOME card!
Simply gorgeous!
Stunning! Absolutely Stunning!
I always admire your designs and this one is exceptional! Thank you for sharing this with us. ❤️
Mary, this card is gorgeous with the foils and curvy dies. Your tip on putting a piece of copy paper between the foil and cover plate works like a charm. I am enjoying using foils more. Enjoy your day!