
If you love pretty paper and want a fantastic variety of scrapbook and card-friendly designs, I highly recommend Stampin’ Up! Delightfully Eclectic Designer Series Paper. You get 48 – 12 x 12 double sided sheets (4 each of 12 designs) of paper crafting heaven.
WHAT I LOVE ! Fresh Freesia is here to stay and looks crisp and cool with Basic Black on today’s card. Learn more about the new and returning Stampin’ Up! Colors here. The sentiment (Something Fancy Stamp Set) is framed with stitched circles from the Stampin’ Up! Stylish Shapes Die Collection – a must have for your card making essentials!

NEED SKETCH INSPIRATION? The layout of today’s thank you card was inspired by the newest addition to my Stampin’ Pretty Sketchbook, Sketch #66, which I shared on here!

Enjoy FREE sketch ideas with coordinating project tutorials in my Stampin’ Pretty Sketchbook here.
my simple card tutorial
CUT YOUR CARD STOCK – DIMENSIONS:
- Basic White Thick Card Stock:
- Card Base – 4 1/4 x 11, scored at 5 1/2
- Basic Black Card Stock
- Layer – 5 x 2 3/4
- Die-Cut Circle – 2 1/2 x 2 1/2 (before die-cutting)
- Basic White Card Stock:
- Sentiment Die-Cut – 2 x 2 (before die-cutting)
- Delightfully Eclectic Designer Series Paper:
- Layer – 5 x 2 3/4
- Envelope Flap – 5 3/4 x 2 1/4

PROJECT TUTORIAL:
Begin by burnishing the fold of the Basic White Thick card base with a Bone Folder.
Adhere the Delightfully Eclectic DSP layer to the Basic Black Layer with Multipurpose Liquid Glue.
Wrap with Black Baker’s Twine Essentials, securing with a bow.
Adhere to the card as shown with Stampin’ Dimensionals.
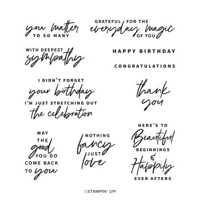
Use a Clear Block C to stamp the sentiment (Something Fancy Stamp Set) in Tuxedo Black Memento Ink onto the Basic White layer.

Crop the stamped sentiment and the Basic Black layer with a Stampin’ Cut & Emboss Machine (Standard or Mini) and the 1 5/8 & 2 1/8 stitched circles from the Stylish Shapes dies.
Adhere together and to the card with Stampin’ Dimensionals.
POP OF PERSONALITY! Embellish the sentiment with a large black Classic Matte Dot.
PERFECT POLISH! Use Multipurpose Liquid Glue to adhere the Designer Series Paper to the outside flap of a Basic White Medium Envelope. You can see my video demonstration with tips on adding designer paper to an envelope flap here.
stampin’ up! product spotlight!


oh, so pretty card idea!


OH, SO PRETTY! The card above was also inspired by a sketch (#59) from my Stampin’ Pretty Sketchbook and uses DSP and the Stylish Shapes dies for a chic thank you card. You can see the original blog post and project tutorial here.

free designer series paper color resources
WHAT COLOR IS THAT? I offer FREE designer series paper coordinating color charts that make the art of choosing colors, coordination and creating simple cards even easier.
promos, specials, & important updates


don’t forget your tulip rewards!

MY CUSTOMER EXCLUSIVE! Tulip Loyalty Rewards are my way of personally saying thank you to my frequent online shoppers. Earn a tulip for every $50 increment you spend on Stampin’ Up! products (purchased through me). Redeem tulips for a free stamp set (5 tulips) or bundle (10 tulips)!
my project supply list – click products to shop online!


Price: $30.00


That is beautiful!