
NEED SKETCH INSPIRATION? HERE YOU GO! The layout of today’s thank you card was inspired by the newest addition to my Stampin’ Pretty Sketchbook, Sketch #59, which I shared on Tuesday!

Enjoy more sketch ideas in my Stampin’ Pretty Sketchbook here.
Click here or the button below to print or save my complete sketchbook!

WHAT I LOVE ❤️! I adore how the stitching from the Stitched Rectangles, Tailor Made Tags, and Stylish Shapes dies coordinate and tie this chic look together. All three die sets are a must-have in your paper craft tool collection!


my simple card tutorial
CUT YOUR CARD STOCK – DIMENSIONS:
- Basic Black Card Stock:
- Card Base – 4 1/8 x 11. Scored at 5 1/2
- Layer – 2 1/2 x 4 1/2
- Basic White Card Stock:
- Sentiment Die-cut Layer – 2 x 2 (before die-cutting)
- Die-cut Tag – 2 1/4 x 4 1/4(before die-cutting)
- Die-cut Layer – 3 3/4 x 5 (before die-cutting)
- Blushing Bride Card Stock:
- Die-cut Layer – 4 1/8 x 5 1/2(die-cutting))
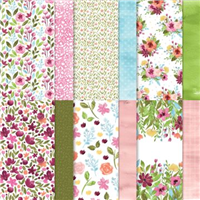
- Awash in Beauty Designer Series Paper:
- Layer – 2 x 4 1/4
- Envelope Flap – 5 3/4 x 2 1/4

PROJECT TUTORIAL:
Begin by burnishing the fold of the card base with a Bone Folder.
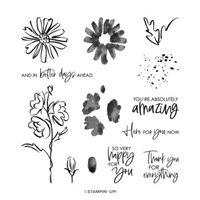
Use a Stamparatus to position and stamp the following (Color & Contour)onto the coordinating Basic White layers:
- Floral petals – Blushing Bride Classic Ink
- Floral outline and sentiment- Tuxedo Black Memento Ink
Crop with a Stampin’ Cut & Emboss Machine (Standard) and the following:
- Floral – Largest Tailor Made Tag (straight edge) – 2 x 3 7/8
- Sentiment – 3rd Smallest Stylish Shapes Circle – 1 7/8
- Blushing Bride Layer – 3 3/4 x 5 1/8 Stitched Rectangle Die
- Basic White Layer – 3 3/8 x 4 3/4 Stitched Rectangle Die
Layer and adhere the Stitched Rectangle die-cuts together and to the card with Stampin’ Seal.
Layer and adhere the Designer Series Paper to the Basic Black layer together and to the card with Stampin’ Seal.

Thread black Baker’s Twine Essentials through the hole at the top of the tag, securing with a bow.
Adhere the tag to the card with Stampin’ Dimensionals.
Adhere the sentiment as shown with Stampin’ Dimensionals. TIP: Double up the dimensionals on the right side!
POP OF PERSONALITY! Embellish with three small Black Matte Dots.
PERFECT POLISH! Use Multipurpose Liquid Glue to adhere the Designer Series Paper to the outside flap of a Basic White Medium Envelope. You can see my video demonstration with tips on adding designer paper to an envelope flap here.
OH, SO PRETTY!


OH, SO PRETTY! A chic birthday card with a similar color palette and lots of layers! You can see the original blog post and project tutorial here.
promos, specials, & important updates


don’t forget your tulip rewards!

MY CUSTOMER EXCLUSIVE! Tulip Loyalty Rewards are my way of personally saying thank you to my frequent online shoppers. Earn a tulip for every $50 increment you spend on Stampin’ Up! products (purchased through me). Redeem tulips for a free stamp set (5 tulips) or bundle (10 tulips)!


In checking your tutorial we could print – the card stock colors and dimensions are not for this card. I’m sure it’s just a “glitch”
Hi Linda,
Sorry, I am not sure how the product list updated but the verbiage did not. I have corrected the tutorial and you can find the updated version here.
I know I said this in yesterday’s post, but it’s worth repeating… Your cards are so elegant and look like they would be difficult, but they’re actually really simple. I’m not a fan of fun folds, so that’s something else I like about your cards…just a typical card.
Great sketch, Mary. I love this pretty card! Enjoy your day!
Such a beauty! The combination of Blushing Bride and Basic Black is so modern and cool. So sweet!