
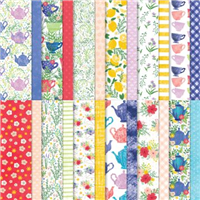
The Stampin’ Up! Tea Boutique Designer Series Paper offers a simple, lemon-licious pattern for today’s classy and modern card!
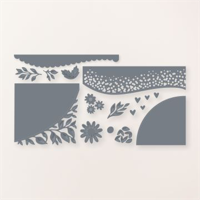
WHAT I LOVE! To create the perfect layers of the curved shape (measurements below), I lined up the curved die from Around the Bend Dies over both layers and cropped them together (at the same time) with the Stampin’ Cut & Emboss Machine. I realigned the layers so there’s an even border of Garden Green on three sides. Even the stitching carries through! See this tip in action with my WOW! 101 Slide Show below!

NEED SKETCH INSPIRATION? The layout of today’s thank you card was inspired by the newest addition to my Stampin’ Pretty Sketchbook, Sketch #64, which I shared on Tuesday!

Enjoy FREE sketch ideas with coordinating project tutorials in my Stampin’ Pretty Sketchbook here.
my simple card tutorial
CUT YOUR CARD STOCK – DIMENSIONS:
- Basic White Thick Card Stock:
- Card Base –4 1/4 x 11, scored at 5 1/2
- Layer – 3 3/4 x 5
- Basic White Card Stock:
- Stamped Layer – 2 3/4 x 3 /4 (before cropping ends)
- Garden Green Card Stock:
- Layer – 4 x 3 1/2 (before die-cutting)
- Tea Boutique Designer Series Paper:
- Striped Layer – 1 5/8 x 5 (leaving a FULL stripe on each side)
- Lemon Layer – 4 x 3 1/4 (before die-cutting)
- Envelope Flap – 5 3/4 x 2 1/4


GET 100+ CARD SKETCH IDEAS FREE! Subscribe to my email updates & instantly receive a FREE digital gift of 100+ Card Sketch Ideas that you can save or print! Subscribers also receive my daily card ideas and tutorials, special offers, new product releases and exclusive “subscriber-only” resources.
PROJECT TUTORIAL:
Begin by burnishing the fold of the card base with a Bone Folder.
Layer and adhere the striped Tea Boutique DSP to the Basic White layer with Multipurpose Liquid Glue.
Adhere to the card base with Stampin’ Dimensionals.
Layer the lemon Tea Boutique DSP on top of the Garden Green card stock. Use a Stampin’ Cut & Emboss Machine to crop them both at the same time with the curved Around the Bend Die (see the WOW 101 feature below).
Move the lemon DSP layer about 1/8″ to the left, creating the same Garden Green border on the curved edge as the top and bottom.
Adhere together with Multipurpose Liquid Glue.
Wrap with Garden Green twine (Three Twine Combo Pack), securing with a bow.
Adhere to the card as shown with Stampin’ Dimensionals.

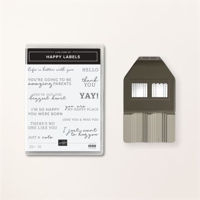
Use a Stamparatus or a Clear Block to stamp the sentiment (Happy Labels Stamp Set) in Garden Green Classic Ink as shown onto the Basic White layer.
Crop the ends with the Happy Labels Punch.
Adhere to the card as shown with Stampin’ Dimensionals.
PERFECT POLISH! Crop the bottom edge of the envelope flap DSP with a Stampin’ Cut & Emboss Machine (Standard) and the Basic Borders stitched curved die. Use Multipurpose Liquid Glue to adhere the Designer Series Paper to the outside flap of a Basic White Medium Envelope. You can see my video demonstration with tips on adding designer paper to an envelope flap here.
stampin’ up! product spotlight!


MY FAVORITE THINGS! The Tea Boutique 6×6 Designer Series Paper is part of the Tea Boutique Suite Collection, which is just one of My Favorite Things from the RETIRING Stampin’ Up! 2022-2023 Annual Catalog! Shop all of My Favorite Things here.
promos, specials, & important updates


don’t forget your tulip rewards!

MY CUSTOMER EXCLUSIVE! Tulip Loyalty Rewards are my way of personally saying thank you to my frequent online shoppers. Earn a tulip for every $50 increment you spend on Stampin’ Up! products (purchased through me). Redeem tulips for a free stamp set (5 tulips) or bundle (10 tulips)!


I love this take on your sketch. The card is beautiful with the curved edge. Thanks for the short video with tips. Enjoy your day!