
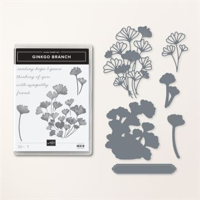
Today’s friend card is another example of why I’m groovin’ on the Stampin’ Up! Gingko Branch Bundle. Luscious layers and yummy colors give the card a bold and lively personality.
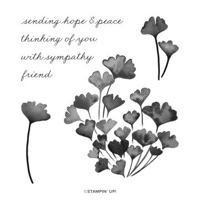
WHAT I LOVE ! Color on color! Stamping the gingko branch in Starry Sky ink onto Orchid Oasis card stock produces a textured and subtle richness.
NEED COLOR INSPIRATION? The colors used on this card are based from the color combination shown below, one of five that I shared on Tuesday’s post.

my simple card tutorial
CUT YOUR CARD STOCK – DIMENSIONS:
- Orchid Oasis Card Stock:
- Card Base – 4 1/4 x 11, scored at 5 1/2
- Stamped Die-cut- 3 3/4 x 4 (before die-cutting)
- Starry Sky Card Stock:
- Layers – 4 x 5 1/4, 2 3/4 x 4
- Crushed Curry Card Stock:
- Layer – 3 1/4 x 4 1/2
- Very Vanilla Card Stock:
- Layer – 3 3/4 x 5
- Die-cut Sentiment Layer – 2 x 1 (before die-cutting)
- Hues of Happiness Designer Series Paper:
- Layer – 2 1/2 x 3 3/4
- Envelope Flap – 5 3/4 x 2 1/4


GET 100+ CARD SKETCH IDEAS FREE! Simply subscribe to my newsletter today & instantly receive a digital gift of 100+ Card Sketch Ideas that you can save or print! PLUS, you’ll receive my latest card ideas and tutorials, special offers, new product drops and exclusive “subscriber-only” resources.
PROJECT TUTORIAL:
Begin by burnishing the fold of the Orchid Oasis card base with a Bone Folder.
Layer and adhere the Very Vanilla and Starry Sky layers together and to the card base with Stampin’ Seal.
Layer and adhere the Hues of Happiness DSP, Starry Sky layer and Crushed Curry layer together with Stampin’ Seal and to the card with Stampin’ Dimensionals.
Use a Stamparatus to position and stamp the sentiment (Ginkgo Branch Stamp Set) in Starry Sky Classic Ink onto the Very Vanilla layer.
Use a Stamparatus to position and stamp the the Ginkgo leaves (Ginkgo Branch Stamp Set) in Starry Sky Classic ink onto the Orchid Oasis layer.
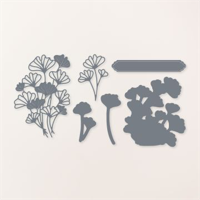
Crop both with a Stampin’ Cut & Emboss Machine (Standard)and the coordinating Ginkgo Branch dies.

Adhere both as shown with Stampin’ Dimensionals.
POP OF PERSONALITY! Embellish with an Orchid Oasis 2022-2024 Decorative Matte Dot.
PERFECT POLISH! Use Multipurpose Liquid Glue to adhere the Designer Series Paper to the outside flap of a Basic White Medium Envelope. You can see my video demonstration with tips on adding designer paper to an envelope flap here.
OH, SO PRETTY!


OH, SO PRETTY! The card above showcases the design of the detailed Ginkgo Branch die and the full width of the long sentiment die with the gorgeous embossed border. You can see the original blog post and project tutorial here.
stampin’ up! product spotlight!


MY FAVORITE THINGS! The 2022-2024 In Color Collection of products made My Favorite Things from the 2022-2023 Annual Catalog! You can see all of my favorite things here.
promos, specials, & important updates


don’t forget your tulip rewards!

MY CUSTOMER EXCLUSIVE! Tulip Loyalty Rewards are my way of personally saying thank you to my frequent online shoppers. Earn a tulip for every $50 increment you spend on Stampin’ Up! products (purchased through me). Redeem tulips for a free stamp set (5 tulips) or bundle (10 tulips)!


That color combination is beautiful!!
I love the color combination of this beautiful card, Mary. Enjoy your day!