
Today’s friend card sends a bold, graphic message of sweetness. The simple patterns of designer series paper are layered and angled for a snappy and colorful twist!
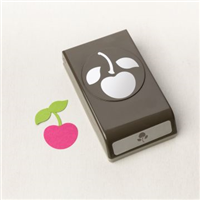
WHAT I LOVE! The Stampin’ Up! Cherry Builder Punch crisply crops the cherries, stems and leaves for quick paper crafting magic!
NEED SKETCH INSPIRATION? The layout of today’s friend card was inspired by the newest addition to my Stampin’ Pretty Sketchbook, Sketch #60, which I shared on Tuesday!

Enjoy FREE sketch ideas with coordinating project tutorials in my Stampin’ Pretty Sketchbook here.
my simple card tutorial
CUT YOUR CARD STOCK – DIMENSIONS:
- Basic White Thick Card Stock:
- Card Base – 4 1/4 x 11, scored at 5 1/2
- Basic White Card Stock:
- Die-Cut Layer – 3 1/2 x 4 1/2 (before die-cutting)
- Real Red, Old Olive, and Basic Black Card Stock:
- For Punching – 3 x 3 each
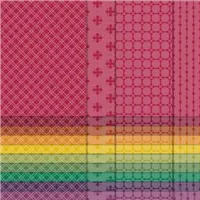
- Regals 6 x 6 Designer Series Paper:
- Layers – 3 1/4 x 4 1/2 each
- Envelope Flap – 5 3/4 x 2 1/4

PROJECT TUTORIAL:
Begin by burnishing the fold of the card base with a Bone Folder.
Adhere the Old Olive and Real Red layers to the card base as shown with Stampin’ Seal.
Crop the Basic White layer with a Stampin’ Cut & Emboss Machine (Standard or Mini) and the 3 x 4 1/4 Stitched Rectangle Die.
Use a Stamparatus to position and stamp the sentiment in Tuxedo Black Memento Ink onto the cropped layer.
Adhere to the card with Stampin’ Dimensionals.
Layer and adhere the Designer Series Paper to the Basic Black layer together and to the card with Stampin’ Seal.

Use the Cherry Builder Punch to crop the cherry (Real Red), stem (Basic Black) and leaves (Old Olive).
Adhere the cherries with Stampin’ Dimensionals and the stems and leaves with Multipurpose Liquid Glue.
POP OF PERSONALITY! Embellish with a Matte Black Dot.
PERFECT POLISH! Use Multipurpose Liquid Glue to adhere the Designer Series Paper to the outside flap of a Basic White Medium Envelope. You can see my video demonstration with tips on adding designer paper to an envelope flap here.
OH, SO PRETTY!


OH, SO PRETTY! A fun friend card quickly cropped with ease using the Ladybug Builder Punch! You can see the original blog post and project tutorial here.
stampin’ up! product spotlight!


be a part of something special!
I have the privilege of leading a welcoming, nationwide community of over 700 paper crafting enthusiasts. I support them with daily communication, kindness and a whole lotta paper crafting inspiration, prizes and fun! Your card making confidence will bloom and you’ll fit right in to this artistic, friendly and positive environment.
You’ll never be pressured to sell or build a business! THIS IS ABOUT YOU!
promos, specials, & important updates


don’t forget your tulip rewards!

MY CUSTOMER EXCLUSIVE! Tulip Loyalty Rewards are my way of personally saying thank you to my frequent online shoppers. Earn a tulip for every $50 increment you spend on Stampin’ Up! products (purchased through me). Redeem tulips for a free stamp set (5 tulips) or bundle (10 tulips)!


Cheery card, Mary! Thanks for another great sketch.
Cute card, Mary, using the new sketch for inspiration. Enjoy your day!