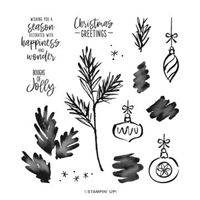
This pair of Simple and Stepped-Up cards were constructed using the Decorated with Happiness Bundle, which is part of My Favorite Things from the Stampin’ Up! 2022 Holiday Mini Catalog. You can shop all of My Favorite Things here.

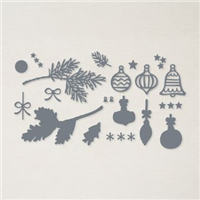
BUNDLE & SAVE 10%! Purchase the Decorated with Happiness Photopolymer Stamp Set and the coordinating Decorated Pine Dies together as a bundle and SAVE 10%! See all the available Stampin’ Up! 10% off bundles in my online store here.

CUT YOUR CARD STOCK – DIMENSIONS:
- Basic White Thick Card Stock:
- Card Base – 4 1/4 X 11, scored at 5 1/2
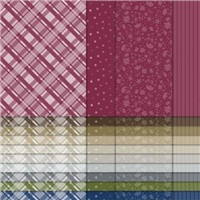
- Mossy Meadow 6×6 Designer Series Paper:
- Card Layer – 4 x 5 1/4
- Envelope Flap – 2 x 5 34
- Crumb Cake Card Stock:
- Layer – 2 3/4 x 5 1/4
- Die-Cuts & Sentiment Layer – 4 x 3 (before cropping)
- Old Olive Card Stock:
- Die-Cut Layer – 4 3/4 x 3 1/4
- Real Red Card Stock (stepped-up card only):
- Flagged Banner – 4 x 2
PROJECT TUTORIAL:
Begin by burnishing the fold of the card base with a Bone Folder.
Adhere the Crumb Cake and Mossy Meadow Designer Series Paper layers together and to the card base with Stampin’ Seal.
Use a Stampin’ Cut & Emboss Machine (Standard) and the detailed Decorated Pine die to crop the Mossy Meadow card stock layer.
Adhere as shown with small dots of Multipurpose Liquid Glue. This allows the ends of the die-cut to flow freely above the card..

Use a Stamparatus to stamp the sentiment and two ornaments in Mossy Meadow Classic Ink onto the Crumb Cake layer.
Crop all three with a Stampin’ Cut & Emboss Machine (Standard) and the coordinating Decorated Pine dies and the 1-5/8 Layering Circle die.
TIP: After stamping the ornaments, use the small hole on the die stem to be sure the stem is lined up with the stamped image.
Adhere to the card as shown with Stampin’ Dimensionals.
POP OF PERSONALITY! Embellish with Rustic Metallic Adhesive Backed Dots.
THE PERFECT POLISH! Use Multipurpose Liquid Glue to adhere the Designer Series Paper to the outside flap of a Basic White Medium Envelope. NOTE: Since the DSP is slightly smaller than the envelope flap, use a Paper Trimmer to cut the flap to the same size as the DSP.

STEPPED-UP PROJECT TUTORIAL:
Begin by burnishing the fold of the card base with a Bone Folder.
Adhere the Crumb Cake and Mossy Meadow Designer Series Paper layers together and to the card base with Stampin’ Seal.
Use a Stampin’ Cut & Emboss Machine (Standard) and the detailed Decorated Pine die to crop the Mossy Meadow card stock layer.
Adhere a shown with small dots of Multipurpose Liquid Glue. This allows the die-cut ends to flow freely above the paper.
Flag the end of the Real Red card stock layer as shown with Paper Snips.
Wrap with Linen Trim securing with a bow.
Adhere to the card with Stampin’ Dimensionals.

Use a Stamparatus to stamp the sentiment and two ornaments in Mossy Meadow Classic Ink onto the Crumb Cake layer.
Crop all three with a Stampin’ Cut & Emboss Machine (Standard) and the coordinating Decorated Pine dies and the 1-5/8 Layering Circle die.
TIP: After stamping the ornaments, use the small hole on the die stem to peek through to the stamped image and be sure it’s lined up.
Adhere to the card as shown with Stampin’ Dimensionals.
POP OF PERSONALITY! Embellish with Rustic Metallic Adhesive Backed Dots.
THE PERFECT POLISH! Use Multipurpose Liquid Glue to adhere the Designer Series Paper to the outside flap of a Basic White Medium Envelope. NOTE: Since the DSP is slightly smaller than the envelope flap, use a Paper Trimmer to cut the flap to the same size as the DSP.

Have a paper crafter in your life and looking for the perfect Christmas gift? OR How about a great gift idea for someone to give YOU?
Purchase an Instant Stampin’ Pretty E-Gift Card! It’s easy (see order form below, minimum $25).
The e-gift card will be emailed to the recipient! You can send it immediately or schedule email delivery for a future date! PLEASE NOTE e-gift cards purchased through me must be redeemed through me.
To send the email to the recipient at a future date, please click on the button next to the email address field as shown below. IMPORTANT! PLEASE NOTE the email is sent based on the CENTRAL time zone. Please adjust delivery as needed for your time zone.
Click this link to see the current time: https://www.timeanddate.com/time/zone/usa/madison
Mary


My project supply list. Click products to shop on-line!