
Welcome to the Stampin’ Pretty Pals’ Blog Hop!
This month, the theme is Create Your Own Background. We really hope that you will be inspired by all the amazing creations the Pals are sharing with you! As you hop from blog to blog, we would love for you to leave a comment. You will find the lineup at the end of my post to help you “hop” along from Pal to Pal.
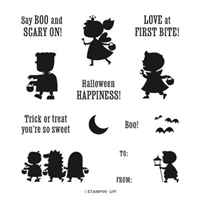
 My background was created by adding the fabulous new Glitter Washi Tape from the NEW July – December Mini Holiday Catalog. I paired it with one of My Favorite Things – the Scary Cute Bundle.

STAMPIN’ PRETTY STEP-BY-STEP TUTORIAL:
Begin with a 4 1/4 x 5 1/2 card base of Gray Granite card stock.
Adhere strips of Glitter Washi Tape to a 3 1/2 x 3 3/4 piece of Basic Black card stock as shown.
Use a Paper Trimmer or Paper Snips to trim the edges of the washi tape to be even with the card stock.
Adhere to the card with Stampin’ Dimensionals.

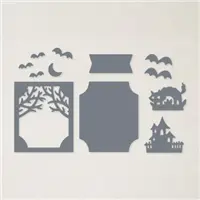
Use a Stampin’ Cut & Emboss Machine and the Scary Silhouette Dies to crop the following:
- Basic Black card stock: cat, bat, haunted house and scary frame (two layered dies)
- Gray Granite card stock: frame background
Adhere the scary frame and haunted house to the Gray Granite die-cut with snipped-to-size Black Stampin’ Dimensionals.
Adhere the bat and cat as shown with Multipurpose Liquid Glue.

Use a Stamparatus to position and stamp the “Boo!” sentiment in Versamark Ink onto a 1/2 x 1 piece of Basic Black card sock that has been flagged with the Banners Pick a Punch.
Cover with white Basic’s Embossing Powder. Set with a Heat Tool.
Add a touch of Glitter Washi tape to the top and adhere a bow of black Baker’s Twine Essentials with a Mini Glue Dot.
POP OF PERSONALITY! Embellish with Matte Black Dot.

More inspiration awaits, so use the lineup below to visit the rest of the Design Team. The Pals are excited to show you what they’ve created!
Please mark your calendars for our next blog hop on August 10th. Our theme will be Seasons’ Greetings, where we will showcase projects inspired by our favorite seasonal time of the year.
Until then, have fun in your craft space!
Stampin’ Pretty Pals Blog Hop Line-Up:
- Mary Fish at Stampin’ Pretty
- Melissa Seplowitz at The Stamping Ninja
- Sue Jackson at Just Peachy Stamping
- Su Mohr at Aromas And Art
- Beth McCullough at Stamping Mom
- Ann Murray at Murray Stamps INK
- Jackie Beers at Blue Line Stamping
- Tricia Chuba at ButterDish Designs
- Deb Walker at Deb Stamps Life
- Pamela Sadler at Stampin Pink Rose
- Lori Pinto at LollyPop Paper and Ink
- Lisa Ann Bernard at Queen B Creations
- Stesha Bloodhart at Stampin’ Hoot!
- Peggy Noe at Pretty Paper Cards
- Mary Hanson at Up North Stampin’
- Rae Harper Burnet at Wild West Paper Arts
Mary


My project supply list. Click products to shop on-line!


Hi Mar
I love yr card very pretty I love going through the blog hop every month seeing all the creativity I learn something new every time
Good use of washi for the focal background. Love the scary cute comment earlier.
Scary cute I say!
Love this sparkly background in the cute Halloween colors. Darling card, Mary!
Such a darling card, Mary! Great idea to use the Washi Tape! 🙂
This card just sealed the deal for me. I knew I wanted the washi tape, but your card made me want the bundle. So cute! Love it!
Ohhh, I love washi tape. Great idea and so cute!!
This is super cute and unusual! Love it!!
I love the layout of your card and your background technique is great.
Clever use of the Washi Tape, Mary! Scary cute!
SO FUN. LOVE how you used the washi tape.
That cat is OH SO PERFECT!
You are so clever to use the glitter washi tape for the background of this very fun Halloween card. Enjoy your day!
Nice card but can you make one for those of us that do not do That holiday.
This card could be easily duplicated with card stock strips and another theme such as Christmas, etc. Think of it as just a template. Mary
Simply adorable Mary! Love seeing how you put your own stamp on Scary Cute:)
Oh my! I love everything about this card! The small touches are wonderful like the little banner and the cat on top of the layer.