
Today’s card was CASE’d from the Little Love Card (below) that I created and shared on my blog back on February 25, 2016! I used the layout and colors as inspiration, I just changed them up a little bit using current Stampin’ Up! products! You can find 2,000+ cards to CASE in my gallery here.  “Copy” means “allow yourself to be influenced by” another paper crafter’s projects. CASE-ing is a great way to be inspired! Focus on an aspect of a creation (sketch, colors, images) that you absolutely love and use it to make something of your own.


 STAMPIN’ PRETTY STEP-BY-STEP TUTORIAL:
Begin with a 4 1/4 x 5 1/2 card base of Misty Moonlight card stock.
Use a Paper Trimmer to cut a 4 x 5 1/4 piece of Basic White card stock and a 3 3/4 x 5 piece of Soft Sea Foam card stock.
Use the Detailed Trio Punch to round all four corners of all three pieces of card stock.
Adhere the Basic White piece to the card base with Stampin’ Dimensionals.
Wrap the Soft Sea Foam card stock as shown with White 1/2″ Faux Linen Ribbon, securing to the back side with Stampin’ Seal.
Wrap again with Misty Moonlight and Petal Pink 1/8″ Cotton Ribbon Combo Pack, securing together and to the card with a bow.
Adhere to the card with Stampin’ Seal.

Use a Stampin’ Cut & Emboss Machine (Mini or Standard) to crop four circles from a piece of Basic White card stock using the 1 3/8 Beautiful Shapes die.
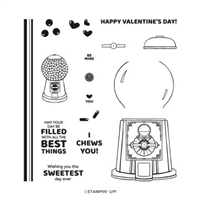
Use a Stamparatus to position and stamp the sentiment (Gumball Greetings Stamp Set) in Misty Moonlight Ink onto the center of a circle. I love how it tucks perfectly inside the heart!
Adhere as shown with Stampin’ Dimensionals.
Use a Stampin’ Cut & Emboss Machine (Mini or Standard) to crop two circles from a piece of Misty Moonlight card stock and two circles from Petal Pink card stock using the 1″ Beautiful Shapes die.
Zip through a Stampin’ Cut & Emboss Machine (Mini or Standard) to crop the heart (Here For You Dies) from the center of the 1″ circles.
Adhere as shown with snipped-to-size Mini Stampin’ Dimensionals.

POP OF PERSONALITY! Embellish with a single Basic White Classic Matte Dot.
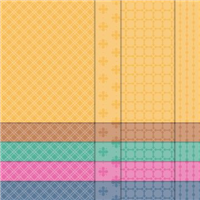
PERFECT POLISH! Crop a 5 3/4 x 2 1/2 piece of Misty Moonlight 2020-2022 In Color Designer Series paper with a Stampin’ Cut & Emboss Machine (Standard) and the curved Basic Borders Die. Use Multipurpose Liquid Glue to adhere to the outside flap of a Basic White Medium Envelope. Trim the envelope flap to size with Paper Snips. You can see my video demonstration with tips on adding designer paper to an envelope flap here.

Mary


My project supply list. Click products to shop on-line!


What die did you use for the heart?
Hi Marge, The heart die is from the Here For You Dies #159278. Please let me know if I can assist you further. Have a fabulous day! Mary
I love those colors together! Misty Moonlight is one of my favorites!
I love both of these cards, Mary. Both color combinations are fun. Enjoy your day!
You SHINED on this remake. It is so retro, fun and SCREAMS Mary Fish. TFS!