 I know that many of us need to create a lot of Christmas and winter holiday cards. Today’s simple Saturday cards couldn’t get much easier for “mass production” but still deliver lots of WOW!

CARD #1 BLUE: MY STEP-BY-STEP TUTORIAL:
Create a 4 1/4 x 5 1/2 card base using Thick Whisper White card stock and the Stampin’ Trimmer. The trimmer cuts and scores!
Adhere a 4 x 5 1/4 piece of Garden Impressions Designer Series Paper to the card base with Snail Adhesive.
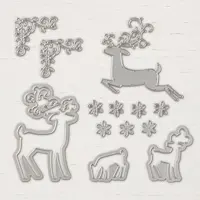
Cut a piece of Thick Whisper White card stock to 3 3/4 x 5. Run through the Big Shot Die-Cutting Machine with the deer die from the Detailed Deer Thinlits Dies. TIP: I used Thick Whisper White for the top layer. It is sturdier when adding a layer with negative space (in this case the deer).

Using the Stamparatus stamp positioning tool, stamp the “Cheers to the New Year” sentiment (Warm Hearted) in Blueberry Bushel Ink onto the Thick Whisper White layer, angled with the deer.

Adhere to the card base with Stampin’ Dimensionals. TIP: When using the negative space of a die, use Stampin’ Dimensionals and Mini Stampin’ Dimensionals generously, especially around the die cut area. This really takes advantage of the 3-D effect.


CARD #2 GOLD: MY STEP-BY-STEP TUTORIAL:
Create a 5 1/2 x 4 1/4 card base using Thick Whisper White card stock and the Stampin’ Trimmer.
Adhere a 5 1/4 x 4 piece of Gold Foil to the card base with Snail Adhesive.
Cut a piece of Thick Whisper White card stock to 5 x 3 3/4. Run through the Big Shot Die-Cutting Machine with the deer die from the Detailed Deer Thinlits Dies. Tip: I used Thick Whisper White for the top layer. It is sturdier when adding a layer with negative space (in this case the deer).
Using the Stamparatus positioning tool, stamp the “Merry Christmas” sentiment (Warm Hearted) in Versamark Ink. Cover with Gold Stampin’ Emboss Powder. Flick the card stock to remove the excess powder, then set with a Heat Tool.
Adhere to the card with Stampin’ Dimensionals. TIP: When using the negative space of a die, use Stampin’ Dimensionals and Mini Stampin’ Dimensionals generously, especially around the die cut area. This really takes advantage of the 3-D effect.
Create a bow using Stampin’ Up! Real Red 1/8 Solid Ribbon. Adhere with a Mini Glue Dot.


 MORE IDEAS! I used the Detailed Deer Dies and coordinating Dashing Deer stamp set for my gatefold card last Wednesday. You can find a supply list and step-by-step tutorial here.

EARN THE WARM HEARTED PHOTOPOLYMER STAMP SET FREE! Place a Stampin’ Up! order of $150 or more (total before shipping and tax) and earn Stampin’ Rewards. Warm Hearted is exclusively available as a Stampin’ Rewards gift. Learn more about how you can earn Stampin’ Rewards here.
I love hearing from you! Please leave me your questions or comments about the project for today.

If you enjoyed this post, please be sure to . . .
- Receive a FREE PDF tutorial when you subscribe to my daily blog updates here.
- Click for my Monthly Host Code and how you can earn up to a $50 shopping spree with my Tulip Rewards Loyalty Program.
- Check out the clearance rack and save up to 70%.
- Save 10% on coordinating product bundles!
- The $99 Starter Kit is the best deal of ALL! Discounts & benefits here.
- Visit my gallery for 1000+ paper crafting ideas.
- View my FREE PDF Project Tutorials.
- Follow me on Pinterest.
- Subscribe to my YouTube paper crafting video tutorials.


My project supply list. Click products to shop on-line!


Hello Mary, just want to say, BEAUTIFUL cards! You have a great eye for style and colour and through yoyr creativity warmth and much kindness shines through. Have a fabulous creative day ?hugs Maria .
What a delight to read and starts my day with a smile. Thank you, Maria!
As a hobby stamper I made 12 cards each of Dashing Deer with gold foil and Merry Christmas Snowflake card. I am thrilled with tbe way they turned out. Thank you for your tutorials, they are awesome..
You sure know how to make me smile. This warms my heart and I’m so grateful you let me know, Kay!
Love these, Mary! I adore the peek-through view of the paper behind them! Gorgeous!
Thanks, BK. Pretty paper behind the deer opens the door to so many different combinations.
Ooooh, MsMary, BEAUITFUL BEAUITFUL, I love it , that my bundle for Christmas, soon ?
Tfs on how to use the dementions on it ?
Have a lovely Sunday ♥️
I’m so glad having the dimensions and tutorials are helpful, Frenchie!
Mary, these are both stunning…. clean and simple yet very elegant..
Thank you for sharing.
Love your comment. Appreciate your visit, Bernice.
Love all three deer cards. So easy but so beautiful. I will copy all of them! Thank you.
copy away. it’s an honor, Ruby!
Both of these cards are gorgeous, Mary. I love the die cut reindeer as the focal point. So pretty! I think I could CASE these. Enjoy your day!
Nice and easy to create, Hilda. I promise!
Simple but so gorgeous! I particularly like how the deer works so well jumping over the new year sentiment. Clever design 🙂
I love it when you stop and say hello – thanks for your kindness, Cindy!
Yes! SPOT ON with the New Years card. There are “those” years I don’t get around to making all the Christmas cards I would like. Therefore, I make more New Years cards and use them for “Thank You” cards as a win/win card. How can you “go wrong” there? LOL. Bless you for being a wonderful teacher of the art of stamping. Also, your sharing of your talent(s) is a gift to the world. Have a wonderful weekend. I don’t need to tell you to stay warm in AZ, here in WA it is really feeling like Fall. Gorgeous colors all around, to absorb and appreciate, with the eyes. ?
That makes my heart sing, Gigi. Thank you. Temperatures have cooled here. Nice to have windows open and wear long sleeves on my morning walk. Raining today but we always welcome rain in Tucson!
Bold…..Beautiful……And an added layer of FUN makes both of these cards KEEPERS for the upcoming holidays. Thanks for sharing these with us.
It’s hard to decide whether the negative space or the deer die cut is more beautiful, yes? Thanks, Kadie, for your comment.
These cards are beautiful.
And your comment is beautiful, too. Thanks, Sue.
Mary, Love the reindeer cards you have made. Each are so elegant, classy and timeless. Absolutely enjoy each of your posts.
Thanks, Kimberly. I love hearing back from my blog followers on my cards and posts!
Love all three cards, especially the leaping deer ones. What a great way to make a classy card that would be fairly simple when you need to make a bunch. I really love the pdf that you offer with cards also. Thank you so much for doing that.
You are very welcome, Sherlie. Now I need to come up with a card using the white deer I cropped from the negative space.
WOW!! Mary, what a gorgeous and elegant pair of cards, both are amazing, but if I must pick a favorite, it would be the golden one, I love the pop of red and the beautifully embossed sentiment.
Thank you for sharing the dimensions for both cards.
Have a fabulous weekend.
XO
Maria.
Pretty DSP and metallic paper are divine for paper crafting, Maria.
Good Morning Mary, These are beautiful cards, a beautiful decoration too.
Have a blessed day.
🙂
Your comments brighten my day. Thank you, Nancy!
Lovely, cards with clear instructions, these are this years cards for me, can’t wait to get started, thanks so much.