
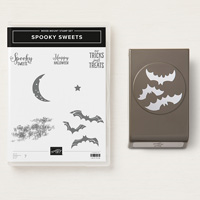
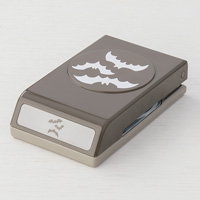
Today’s Halloween Card uses the Stampin’ Up! Spooky Sweets stamp set and coordinating Spooky Bats Punch.

STAMPIN’ PRETTY STEP-BY-STEP TUTORIAL:
Create a 4 1/4 x 5 1/2 card base with Stampin’ Up! Soft Suede card stock and the Stampin’ Trimmer. Layer a 3 3/4 x 5 piece of Early Espresso card stock on an angle as shown and adhere with Snail Adhesive.
Using the Stamparatus (read about this must-have stamp positioning tool here), stamp the texture stamp from Spooky Sweets stamp set on a piece of 3 1/2 x 4 3/4 piece of Sahara Sand.

TIP: Brush a small amount of water over the stamped areas with an Aqua Painter. This adds a soft “sepia” affect. I learned this technique from Stampin’ Up! Demonstrator Mike Funke. Check out his gorgeous fall card and video demonstration. Adhere the Sahara Sand layer slightly on an angle to the card base with Snail Adhesive.
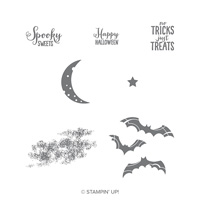
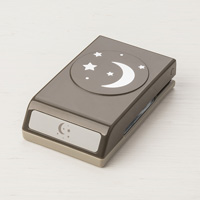
Use the Stamparatus to stamp the three bats, moon and “Happy Halloween” sentiment on Sahara Sand card stock with Soft Suede Ink. Use the Aqua Painter again on the bats and moon to create a “sepia” effect.
Crop the bats using the coordinating Stampin’ Up! Spooky Bats Punch. Crop the moon using the Twinkle Builder Punch. Adhere bats and moon to the card using Mini Stampin’ Dimensionals.
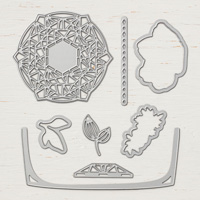
Crop the sentiment with the stitched die from Stitched Labels Framelits Dies. Wrap twice with Linen Thread and tie in a bow. Adhere to card with Stampin’ Dimensionals.

Using the Twinkle Builder Punch, crop stars from Stampin’ Up! Gold Foil Sheets and Early Espresso card stock. Adhere two largest stars with a Mini Stampin’ Dimensionals and adhere the balance of the smaller stars with snail.
Add self-adhesive gold metallic pearls – three on the moon and one on the sentiment.
Crop an Early Espresso polka dot pattern with the envelope liner die (Beautiful Layers Thinlits Dies) and adhere to the outside flap of a Very Vanilla Medium Envelope.

GET SPOOKY & SPLASHY WITH COLOR! I created the card below with the Spooky Sweets stamp set and Spooky Bats Punch. Supply list and tutorial for this card are here. My WOW! video with tips and a closer look at the products is below!
promos, specials, & important updates


don’t forget your tulip rewards!

MY CUSTOMER EXCLUSIVE! Tulip Loyalty Rewards are my way of personally saying thank you to my frequent online shoppers. Earn a tulip for every $50 increment you spend on Stampin’ Up! products (purchased through me). Redeem tulips for a free stamp set (5 tulips) or bundle (10 tulips)!


A beautifully unique take on a Halloween card. I love the shimmer from the foil.
Thanks, Robbye. I think the shiny gold was a nice complement to the neutrals!
This stamp bundle is really growing on me. Great card! Thanks for the reminder of your video about the tips for this bundle, too.
This is definitely my “go to” bundle for Halloween. I couldn’t resist the Spooky Bats Punch.
Love, Love, Love this card! One of my favorites!
Thanks so much, Stesha. It was fun to go from color to neutrals with a touch of gold!
There is SO MUCH about this card that is perfect. Thanks for sharing!
Thanks, Kadie. I love the bats and stars!
Love this card! Have this set.. now I will use it … love the neutral tones of this card!
Thanks so much, Teresa. I just updated the Crumb Cake to Sahara Sand . . . frankly, either would work!
Oh, Mary, Mary, Mary…..I’m in love with this color combination for a Halloween card, totally non-traditional colors but that doesn’t take anything away from the totally spectacular look, love the touch of gold of the stars and pearls, what a fabulous detail.
This card seems to be geared for an adult Trick or Treater, LOL!! This color combination makes it look elegant as well as fun.
Off to Pinning it to my Halloween board.
Thank you so much for sharing, and I love watching the video again.
XO
Thanks, Maria. Great insight. I love the stars and pearls . . . they add so much to the design.
This technique is gorgeous, Mary! Such a lovely effect with the neutral tones! <3
i switched my original idea of glitter stars to gold foil and feel it’s softer with the neutrals metallic pearls.
You hit another one out of the park Mary! It’s so refreshing to have a Halloween card that is not black and orange. Love the neutrals with the little metallic accents and that adorable stitched label.. And thank you for sharing Mike Funke’s sepia technique. Can’t wait to try that with my Aquapainter.
The sepia technique will amaze you. So simple (use very little water) with such a warm, soft effect! Thanks, Linda!
Such a cute and fun card! Am I missing something? Are there also stars on the spooky bats punch?
Oh my heavens . . . I completely neglected to include the Twinkle Builder Punch for cropping the moon and stars. The post and product supply list are updated! Thanks for the heads up, KB!
Love the Halloween card, Cant wait to get it. I love the bundles with the punches, makes everything so easy to use.
Show me a punch and I’m pretty much sold. Thanks, Sherlie!
Oh, Mary, I love this card. It is the best Halloween card I have ever seen. I don’t send out Halloween cards, but this one could sure make me start. Love, love, love the palet!
Have a blessed day.
🙂
I’m glad you enjoy the card, Nancy. Neutrals are always on trend!
That’s adorable!
Thanks, Mary. I thought the wee touch of gold was the perfect complement to the neutrals.
SUPER-DE-DUPER Cute! Love it with this color….FUN!
Thanks, Susan. I love hearing from my fellow clean and simple pal!