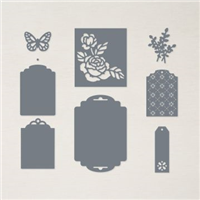
I’m a BIG fan of the Stampin’ Up! Designer Tags dies and added them to the list of My Favorite Things. They are available HERE as a Stampin’ Up! On-Line Exclusive product.
WHAT I LOVE! The beauty of the Designer Tag dies is in the delicate details. Zoom in on the sweet floral pattern on the Pool Party party tag. Ditto on the shape and perforations of the Basic Beige tag (New Stampin’ Up! Color). These quick and easy tags are the perfect complement to the oh, so chic Country Woods Designer Series Paper (DSP).

my simple card tutorial
CUT YOUR CARD STOCK – DIMENSIONS:
- Basic Beige Card Stock:
- Card Base – 4 1/4 x 11, scored at 5 1/2 (top)
- Die-Cut Tag – 3 x 2 1/4 (before die-cutting)
- Pool Party Card Stock:
- Layer – 4 x 5 1/4
- Die-Cut Tag – 2 3/4 x 2 (before die-cutting)
- Early Espresso Card Stock:
- Layer – 3 3/4 x 5
- Misty Moonlight Card Stock:
- Die-Cut Sprig – 2 1/4 x 2 3/4 (before die-cutting)
- Country Woods Designer Series Paper:
- Layer – 3 1/2 x 4 3/4
- Envelope Flap – 5 3/4 x 2 1/2

PROJECT TUTORIAL:
Begin by burnishing the fold of the Basic Beige card base with a Bone Folder.
Adhere the Pool Party layer to the card base with Multipurpose Liquid Glue.
Adhere the Designer Series Paper to the Early Espresso layer with Multipurpose Liquid Glue.

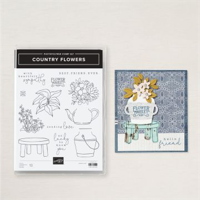
Use a Mini MISTI to stamp the sentiment (Country Flowers Stamp Set) in Misty Moonlight Classic Ink onto the Basic Beige layer. Watch my 1 Minute to WOW video The Magic of the Mini MISTI for a quick demonstration here.
Use a Stampin’ Cut & Emboss Machine (Standard or Mini) and the Designer Tag dies to crop the following:
- Sentiment – Stitched Tag die
- Pool Party – Detailed Floral Tag die
- Misty Moonlight – Sprig
Adhere the sprig die-cut as shown with a Mini Glue Dot.
Double wrap Linen Thread around the Early Espresso/DSP layer and through the holes of die-cut tags, securing with a bow.
Adhere the layer to the card with Stampin’ Dimensionals.

Adhere the Basic Beige tag to the Pool Party tag and to the card with Stampin’ Dimensionals.
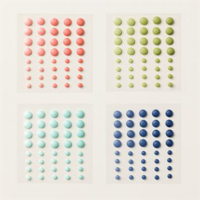
POP OF PERSONALITY! Embellish with a single Night of Navy Ombre Matte Decorative Dot.
PERFECT POLISH! Adhere the 5 3/4 x 2 1/2 Designer Series Paper to the Basic White Medium envelope flap with Multipurpose Liquid Glue. Add glue to the flap first, not the Designer Series Paper.
stampin’ up! product spotlight!


oh, so pretty card idea!


OH, SO PRETTY! The card above also showcases the beauty of the Designer Tag Dies!
promos, specials, & important updates


don’t forget your tulip rewards!

MY CUSTOMER EXCLUSIVE! Tulip Loyalty Rewards are my way of personally saying thank you to my frequent online shoppers. Earn a tulip for every $50 increment you spend on Stampin’ Up! products (purchased through me). Redeem tulips for a free stamp set (5 tulips) or bundle (10 tulips)!