
CARD #1! Today I have THREE posts of THREE Excellent Eggs Easter cards created with the Stampin’ Up! Excellent Eggs dies. Once I started playing with the dies, I simply couldn’t stop! I even made two NEW 1 Minute to WOW! Videos for a closer look at the dies.
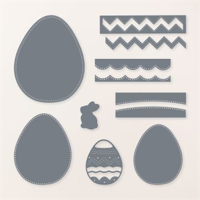
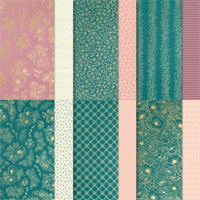
WHAT I LOVE! The Stampin’ Up! Excellent Eggs Dies offer incredibly fun ways to “decorate” Easter eggs and create unique looks. The first card (this post) shows how the small egg die cuts pieces you can mix for a cool mosaic look. The second (coming later this morning) plays up the scallop, zig zag and curved dies. Finally, in the last egg (last post of the day), you’ll see how the patterns of designer series paper (Poetic Expressions) can create quick impact.
wow video: making mosaic easter eggs

CARD 1: A Trio of Mosaic Eggs
my simple card tutorial: excellent eggs easter card
CUT YOUR CARD STOCK – DIMENSIONS:
- Crumb Cake Card Stock:
- Card Base – 5 1/2 x 8 1/2, scored at 4 1/4 (top)
- Early Espresso Card Stock:
- Layer – 5 1/4 x 4
- Petal Pink, Early Espresso, and Flirty Flamingo Card Stock:
- Die-Cut Egg – 2 1/4 x 2 (before die-cutting)
- Very Vanilla Card Stock:
- Layer – 5 x 3 3/4
- Sentiment Strip – 4 x 1
- Forever Love Specialty Designer Series Paper
- Envelope Flap – 5 3/4 x 2 1/4

PROJECT TUTORIAL:
Begin by burnishing the fold of the Crumb Cake card base with a Bone Folder.
Adhere the Early Espresso layer to the card base with Multipurpose Liquid Glue.
Use a Clear Block H to stamp the sentiment (Throughout the Year) in Early Espresso Classic Ink onto the Very Vanilla strip.
Adhere to the card as shown with Stampin’ Dimensionals.
Use a Stampin’ Cut & Emboss Machine (Standard) to crop the three color pieces with the smallest Excellent Eggs die.
Mix the die-cut pieces as shown.
First, use Multipurpose Liquid Glue to adhere the eggs to the card. Next, adhere the decorative pieces into the open spaces with Multipurpose Liquid Glue. TIP: Watch my Stampin’ Pretty WOW Video here.

Wrap the egg die-cuts and Very Vanilla layer with Linen Thread, securing with a bow over the top of the middle egg.
Adhere the layer to the card with Stampin’ Dimensionals.
POP OF PERSONALITY! Embellish the sentiment with the Flirty Flamingo Rainbow Adhesive-Backed Dots.
PERFECT POLISH! Adhere the 5 3/4 x 2 1/4 Designer Series Paper (DSP) to the Very Vanilla Medium envelope flap with Multipurpose Liquid Glue. IMPORTANT: Add glue to the flap first, not the DSP. Center and line up the Basic Borders zig-zag edge die, tape to secure (Post-It Tape) and crop with a Stampin’ Cut & Emboss Machine (Standard).

DO YOU LOVE THESE COORDINATED ENVELOPE FLAPS AS MUCH AS I DO? Here’s a 1 Minute to WOW! Video: Pretty Envelope Flaps in which I demonstrate how I use the Stampin’ Up! Basic Borders Dies to dress up envelope flaps with designer series paper and Basic Borders Dies.
promos, specials, & important updates


don’t forget your tulip rewards!

MY CUSTOMER EXCLUSIVE! Tulip Loyalty Rewards are my way of personally saying thank you to my frequent online shoppers. Earn a tulip for every $50 increment you spend on Stampin’ Up! products (purchased through me). Redeem tulips for a free stamp set (5 tulips) or bundle (10 tulips)!
my project supply list – click products to shop online!


Price: $16.50


Such a gorgeous trio of modern, fun eggs. Love these colors. Your video is fantastic!