
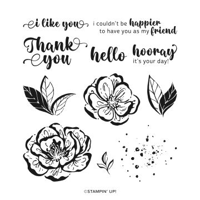
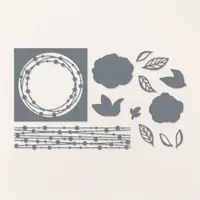
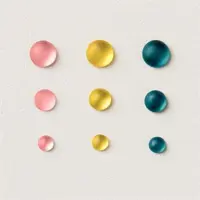
I adore how this gorgeous gatefold card shows off products from the new Stampin’ Up! Hello, Irresistible Suite. The Irresistible Blooms Bundle, Hello, Irresistible Designer Series Paper and Loose Frosted Dots (along with other NEW online exclusives) are available for a limited time and promise to put the WOW! in your spring and summer paper crafting projects.
WHAT I LOVE! The Hello, Irresistible Designer Series Paper offers the rich look of the emboss resist technique (without the work) as well as a collection of fresh patterns with a retro vibe. Oh la la!
my simple card tutorial
CUT YOUR CARD STOCK – DIMENSIONS:
- Basic White Thick Card Stock:
- Card Base – 5 1/2 x 8 1/2, scored at 2 1/8 and 6 3/8
- Basic White Card Stock:
- Belly Band – 9 1/2 x 1 3/4
- Die-Cut – 3 x 3 (before die-cutting)
- Hello, Irresistible Designer Series Paper:
- Layers – 1 7/8 x 5 1/4 (qty 2), 1 5/8 x 5 (qty 2)
- Die-cut Leaves – die-cut image direct from DSP
- Sentiment Die-Cut- 2 x 2 (before die-cutting)
- Belly Band Layer – 4 1/2 x 1 1/2 (qty 2)
- Envelope Flap – 5 3/4 x 2 1/4

PROJECT TUTORIAL:
Begin by burnishing the two folds of the gatefold card base with a Bone Folder.
Layer and adhere the Designer Series Paper layers together and to the card base with Stampin’ Seal. Repeat for the opposite side.
Adhere the two pieces of belly band Designer Series Paper to the Basic White belly band strip with Stampin’ Seal.
Lay the card in the center and mark/score the belly band to wrap around the card. Leave a wee bit of room to allow it to slide on and off.
Use Stampin’ Seal + (extra strength) to adhere the belly band ends together, placing it where it will be covered by the sentiment die-cut.
Crop the Basic White layer with a Stampin’ Cut & Emboss Machine (Standard or Mini) and the Painted Labels die.
Adhere to the belly band as shown with Stampin’ Dimensionals.
Thread white Baker’s Twine Essentials through the die-cut twice as shown, securing with a bow.
Crop the leaves from the Hello Irresistible DSP with a Stampin’ Cut & Emboss Machine (Standard or Mini) and the coordinating Irresistible Blooms dies.

Use a Stamparatus to stamp the sentiment in Versamark Ink onto a piece of Hello, Irresistible Designer Series Paper that has been rubbed with an Embossing Buddy (Embossing Additions Took Kit).
Cover with white Basics Embossing Powder. Tap to remove excess. Set with a Heat Tool.
Crop with a Stampin’ Cut & Emboss Machine (Standard or Mini) and the 2nd smallest Stylish Shapes circle die.
Adhere as shown with Stampin’ Dimensionals.
POP OF PERSONALITY! Embellish with Loose Frosted Dots adhered with a Fine-Tip Glue Pen.
PERFECT POLISH! Use Multipurpose Liquid Glue to adhere the Designer Series Paper to the outside flap of a Basic White Medium Envelope. You can see my video demonstration with tips on adding designer paper to an envelope flap here.
OH, SO PRETTY!


OH, SO PRETTY ! The card above was also created using the gorgeous products from the Hello, Irresistible Suite Collection! You can see the post and project details here.
stampin’ up! product spotlight!


promos, specials, & important updates


don’t forget your tulip rewards!

MY CUSTOMER EXCLUSIVE! Tulip Loyalty Rewards are my way of personally saying thank you to my frequent online shoppers. Earn a tulip for every $50 increment you spend on Stampin’ Up! products (purchased through me). Redeem tulips for a free stamp set (5 tulips) or bundle (10 tulips)!
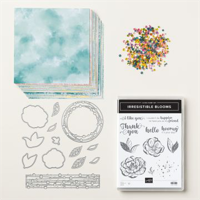


I received my order with the Hello, Irresistible 6 x 6 paper this past week, this paper is gorgeous. I like the watercolor look, the colors are yummy. Mary, thank you so much for this excellent post, your post was all I needed to make the purchase temptation a reality.
Thank you so much for those kind words! Enjoy your new goodies. Mary
Absolutely gorgeous! I mean, how beautiful is this paper?!
Beautiful card, Mary. I love this set! Enjoy your day!
That gatefold card is lovely!