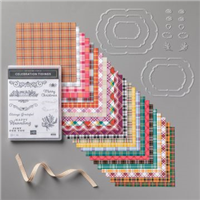
 Yesterday, I shared sketch #16 of my Stampin’ Pretty Sketchbook! As promised, today I am sharing a creation using this sketch and the Plaid Tidings Suite Collection from the Stampin’ Up! 2020 Mini Holiday Catalog.

Enjoy more sketch ideas in my Stampin’ Pretty Sketchbook here.
Click here or the button below to print or save my entire sketchbook!

STAMPIN’ PRETTY STEP-BY-STEP TUTORIAL:
Begin with a 4 1/4 x 5 1/2 card base of Whisper White Thick card stock.
Zip a 3 3/4 x 5 piece of Whisper White card stock through a Stampin’ Cut & Emboss Machine tucked inside a Subtle 3D Embossing Folder.
HOT TIP! See my must-have guide on creating the perfect embossing folder sandwich here.
Adhere to a 4 x 5 1/4 piece of Basic Black card stock with Stampin’ Seal and to the card base with Stampin’ Dimensionals.

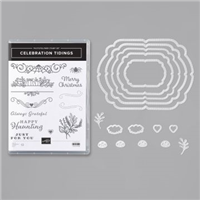
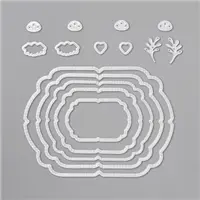
Use the Stampin’ Cut & Emboss Machine, along with the must-have Magnetic Cutting Plate to crop the three Celebration Labels die-cuts:
- Large die-cut (3 1/8 x 4 3/8) Plaid Tidings 6×6 Designer Series Paper
- Cut to 3″ wide
- Medium die-cut (2 5/8 x 3 1/8) Pumpkin Pie card stock
- Cut to 2 5/8″ wide
- Small die-cut (1 5/8 x 2 5/8) Whisper White card stock
- Cut to 2 1/8″ wide
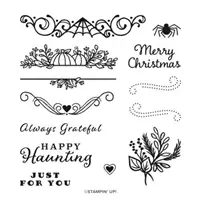
Use a piece of washi tape (or similar) to mask the “Halloween” on the Happy Halloween stamp from the Hallows Magic Night stamp set.
Stamp in Tuxedo Black Memento Ink, remove the mask, apply to the white die-cut as shown.
Mask the “Happy” on the Happy Halloween stamp.
Stamp in Tuxedo Black Memento Ink, remove the mask, apply just below the Happy.

Adhere together and to the card with Stampin’ Dimensionals.
Separate the Black/White Baker’s Twine (Playful Pets Trim Combo Pack), tie into a bow.
Stamp the spider (Celebration Tidings) in Tuxedo Black Memento Ink onto a piece of Whisper White card stock.
Crop with the coordinating Celebration Labels Dies.
Adhere two Basic Black card stock pieces that have been copped with the stems from the Celebration Labels Dies with Mini Glue Dots.
Adhere the baker’s twine and spider as shown with a Mini Black Stampin’ Dimensional.

STAMPIN’ UP! ENVELOPE DIES AVAILABLE NOW! I’m passionate about pretty envelopes and these dies have made the list of My Favorite Things for the Stampin’ Up! Holiday Mini Catalog! Use the Stampin’ Cut & Emboss Machine along with the scalloped edge Envelope Die, to crop a 5 3/4 x 2 1/2 piece of coordinating Plaid Tidings 6×6 Designer Series Paper.
Adhere to the outside flap of the envelope with Multipurpose Liquid Glue.
LEARN HOW! Learn about the possibilities and how to use the Stampin’ Up! Envelopes Dies here.

OH, SO PRETTY IN PLAID! The card below was also created using the Plaid Tidings 6×6 Designer Series Paper. You can see all the details and a tutorial on my blog post here.

 ENDS TODAY, SEPTEMBER 30! GET & GO STARTER KIT PROMOTION! Add the STANDARD Stampin’ Cut & Emboss Machine (or any items of your choice to a $99 Starter Kit and SAVE $26!) See all the details here.
FREE BONUS! You will also receive enough card stock pieces to make 16 cards, a pack of Rhinestone Basic Jewels, the So Much Love stamp set, and the Queen Anne’s Lace stamp set! Learn more about the benefits of the Starter Kit here.

LAST CALL! Today is the last day to use my September Host Code towards Tulip Rewards on orders over $50! You can see the details on my blog page here.
Mary


My project supply list. Click products to shop on-line!


Gorgeous, fun card! i love how you’ve redesigned the sentiment to make it work for you in this layout. Love!
Is it possible that this sketch just keeps getting better. LOVELY creation my friend.