
The results are in and you chose Winter Woods as the Stampin’ Up! holiday bundle (one of four choices) you wanted me to create with next. I love your enthusiasm in voting on the poll (over 1200 votes). I’ll do my best to create with the other bundles, too!

Here is the original poll – The poll has closed.
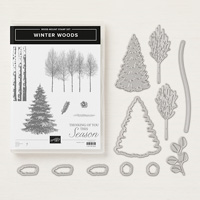
SAVE 10% when you purchase the Winter Woods stamp set and In the Woods Framelits Dies as a coordinating bundle.

STAMPIN’ PRETTY STEP-BY-STEP TUTORIAL:
Create a 4 1/4 x 5 1/2 card base using Thick Whisper White card stock and the Stampin’ Trimmer.
I love the modern look of color blocking and find it’s a great way to use scraps. Layer the following card stock sizes with Snail Adhesive as shown to the card base: 3 x 3 1/2 Pumpkin Pie, 3 1/2 x 4 3/4 Pool Party, 2 x 2 1/2 Crumb Cake.

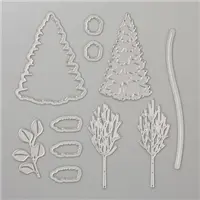
Cut two trees from In The Woods Framelits Dies using the Big Shot, Precision Base Plate and Early Espresso card stock. Adhere to Pumpkin Pie layer.
Using the Big Shot and the curve die from In the Woods Framelits Dies, I created the 4 x 1 3/4 “hill” with Early Espresso card stock. Adhere as shown with Stampin’ Dimensionals.
Using the Stamparatus positioning tool, stamp the sentiment from Dragonfly Dreams stamp set on a 5/8 x 3 1/8 piece of Whisper White card stock. Crop the right side with the Tailored Tag Punch to create a flagged end.
Thread a button (Stampin’ Up! True Gentleman Buttons) with Whisper White Solid Baker’s Twine and tie in a bow. Adhere button to the sentiment with Glue Dots. Adhere sentiment to “hill” with Stampin’ Dimensionals.

Add a touch of bling with three Stampin’ Up! self-adhesive rhinestones.
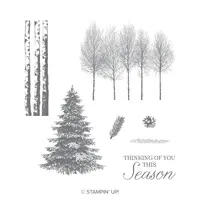
Dress up a Whisper White Medium Envelope by stamping the left side with the tree stamp from Winter Woods stamp set and Early Espresso ink. TIP: Be sure the flap is open so that it doesn’t create a mark from behind when you stamp.

Here is a card I created previously using the Winter Woods Bundle. Details, supply list and a FREE PDF tutorial here.

I love hearing from you! Please leave me your questions or comments about the project for today.

If you enjoyed this post, please be sure to . . .
- Receive a FREE PDF tutorial when you subscribe to my daily blog updates here.
- Click for my Monthly Host Code and how you can earn up to a $50 shopping spree with my Tulip Rewards Loyalty Program.
- Check out the clearance rack and save up to 70%.
- Save 10% on coordinating product bundles!
- The $99 Starter Kit is the best deal of ALL! Discounts & benefits here.
- Visit my gallery for 1000+ paper crafting ideas.
- View my FREE PDF Project Tutorials.
- Follow me on Pinterest.
- Subscribe to my YouTube paper crafting video tutorials.


My project supply list. Click products to shop on-line!


I’m really glad this bundle won. The funny thing is, I wasn’t even going to buy this bundle. I’m so glad I did!. It’s beautiful for so many reasons! I’m also glad you included the ground die cut on your card. I wasn’t really sure what it was for, now I know! Again, Thank you! I’m glad I help vote for this bundle.
It was a resounding YES to the Winter Woods bundle. Thanks for your comment and participation, Gloria!
Mary, I enjoy your cards and thank you for allowing me to subscribe to your tutorials. Looking forward to Orlando and hoping I have an opportunity to meet you in person to thank you.
It would be my pleasure to meet you!
Couldn’t be more amazing. I love this mix of colors and your blocking on this card, <3
Thanks, BK. I know how much you enjoy blocks of color, too!
Oh, what gorgeous colors! This card is perfect for female or male…those are my favorite types of cards. I LOVE the way you stamped the envelope to match. I don’t know if it is me or what, did the tree die cuts seem a little thick to you when you were cutting them??
The trees are thicker than the stamp images . . . makes for pretty layering, Juanita.
Oh my gosh Mary!!! This is gorgeous! I love the modern color combination. It really POPS the black trees!
Thanks, Celia. I was determined to give Winter Woods a modern spin!
Very nice an “clean” sophisticated. Thanks for all your help.
That’s what I love to hear, Gwen, especially with a Simple Saturday design.
This card is simply GORGEOUS my friend. Thanks for sharing with us.
And your comment is GORGEOUS, too, Kadie!
Love this bundle. Thank you for showing both of the cards you have made with this bundle.
Two very different styles but both fun to make with these products, Jeannine!
I love this WOW! card, Mary. The pretty diecut trees along with the color block look really make a great masculine card. Have a great day!
It’s a birthday card for my brother-in-law. I thought it was a good masculine card, too, Hilda!