
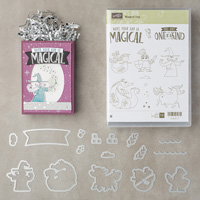
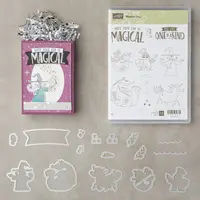
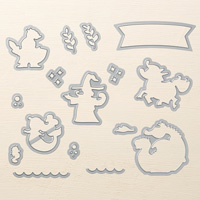
Isn’t this Magical Day dragon birthday card adorable? I’m so proud that I didn’t use a stitch of my beloved Whisper White! The Magical Day stamp set and coordinating Magical Mates Framelits Dies are on the list of My Favorite Things from the Stampin’ Up! Occasions Catalog.

SAVE 10% when you purchase the Stampin’ Up! Magical Day stamp set and coordinating Magical Mates Framelits Dies as a bundle.
STAMPIN’ PRETTY STEP BY STEP:
- Using Bermuda Bay card stock, cut a standard card base (4 1/4″ x 5 1/2″). Score the middle across the long distance at 5 1/2″.

- Cut Crumb Cake card stock to 4″ x 5 1/4″.
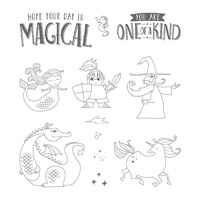
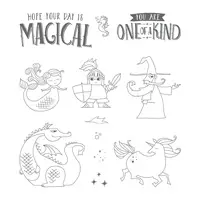
- Stamp “You are one of a kind” from Magical Day stamp set with Basic Black Archival Ink on the Crumb Cake piece created above.
- Add a 4″ x 1 1/4″ strip of Pumpkin Pie card stock as shown.
- Wrap Basic Black Solid Baker’s Twine twice around the Pumpkin Pie strip and tie in a bow. Adhere all to card base.
- Stamp the dragon (Bermuda Bay card stock) and flames (Pumpkin Pie card stock) in Basic Black Archival Ink.

- Crop the dragon and flames using the coordinating dies from Magical Mates Framelits Dies.
- TIP: Use the Big Shot Magnetic Platform to keep dies in place over the images during their journey through the Big Shot Die-Cutting Machine.
- Make this birthday card sparkle. Paint a little “magic” on the scales, gills, wing and flames using Clear Wink of Stella Glitter. “Wink” is a challenge to photograph but this gives you an idea on placement.

- Crop the oval from Basic Black card stock using Stitched Shapes Framelits Dies. Adhere the dragon and flames to the oval using Stampin’ Dimensionals. Adhere the oval as shown using Stampin’ Dimensionals as well.
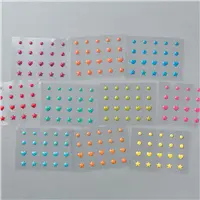
- Random is not so random! The “random” Pumpkin Pie dots (Brights Enamel Shapes) are placed for balance and pop around the sentiment.
ENJOY A FREE TUTORIAL FOR TODAY’S CARD here.
YOUR THOUGHTS? I experimented today (and a post earlier this week) with a step by step approach (vs. primarily tips) and measurements for creating this card. I invite your feedback HERE. Did you find this helpful! I can’t promise I can break project details down at this level every time but let’s see what you think!
I love hearing from you! Please leave me your questions or comments about the project for today.

If you enjoyed this post, please be sure to . . .
- Receive a FREE PDF tutorial when you subscribe to my daily blog updates here.
- Click for my Monthly Host Code and how you can earn up to a $50 shopping spree with my Tulip Rewards Loyalty Program.
- Check out the clearance rack and save up to 70%.
- Save 10% on coordinating product bundles!
- The $99 Starter Kit is the best deal of ALL! Discounts & benefits here.
- Visit my gallery for 1000+ paper crafting ideas.
- View my FREE PDF Project Tutorials.
- Follow me on Pinterest.
- Subscribe to my YouTube paper crafting video tutorials.


My project supply list. Click products to shop on-line!


Such a magical card. That suite is being used in ways that I never even considered.
I love the step by step details. Ty for doing them!!
You’re welcome. I’ll do them as time permits. It’s fabulous to know you like them!
Thank you for including the measurements, so helpful. I’ll be making this darling card this weekend!
Great to hear! Thanks, Julee!
This stamp set is also one of my favourites! It is just SO fun! I love your card and the instructions! Thank you!
Perfect. I’m teaching myself how to put it into a free pdf. Fingers crossed I can share soon.
Truly magical card Mary, this little Dragon is just so sweet, the dies make this bundle even more fun to play with, the little flame blowing out of his mouth is just the cutest detail.
Thank you for sharing.
XO
Maria.
Thank you, Maria. I know how much you adore fun characters (fairies and more)!
Yes, Mary, I did find it very helpful to have your step-by-step directions. It was especially helpful since I am not always able to get to a project right when it is fresh in my mind. So the directions help a lot in refreshing my memory when I finally get to make it. Thank you so much.
good point about being able to easily come back to a project and have all the directions, Renay!
Having the step by step is helpful as sometimes I can’t tell exactly what was done by just looking. Thanks for all your clean but beautiful card posts.
I appreciate your input and kind words, Gloria!
I really liked the step by step instructions – either that or a video. Written instructions are fine too because then you an take your time on each step without trying to follow a moving tutorial. Thanks for being flexible.
Doing best to teach and be flexible, Jan. Thanks for sharing.
Absolute perfection! Love the colors you’ve used and the sweet-and-simple layout for this adorable card.
wow! absolute perfection is marvelous to hear, BK!
Details are very helpful for me, it takes the guess work out and I can enjoy recreating the project quickly and easily. I love your style, you never fail me.
Thanks, Sue. I’ll do my best to offer this when time permits!
The step-by-step is so helpful to beginning stampers. I know it is more time consuming for you and I appreciate the extra effort.
Thanks, Sandra, for adding your thoughts to the conversation.
your ‘dot placement’ thought is spot (hahaha) on…Often I notice ‘something is needed’ when I finish a card. Adding more embellishment seems to just add clutter! the idea of a few dots by scattered around the sentiment is just the right touch….thanks for pointing out this idea….I’m off “to dot” some cards! Thanks for your help!
Thanks, Lynne. I’m a HUGE fan of the enamel dots and shapes!
What a cute card using this little dragon!
I love this bundle to create cards for my two grandchildren.
My 51/2 yr. old granddaughter is all about mermaids and unicorns!
I also enjoy the detailed instructions and measurements but totally
understand that it must take a lot of time to do. I always seem to be able to CASE your cards easily and if there is something I can’t quite get I tweak it a little to make it my own. Thanks for sharing this cut card today, Mary.
I’m happy to hear, Wanda, that if I can’t offer the step by step, my cards are still fairly easy to recreate!
This little dragon is magical……Only thing he is blowing is FUN! Thanks for sharing.
Those little flames make me smile!
Brilliant having the breakdown for the card. Thank you. Makes it easy to follow.
I appreciate the feedback. My average project to post is four to five hours. I’ll consider breaking this down but it will be dependent on time!
I love the step-by-step instructions! Especially the measurements of the smaller pieces as it can be difficult to figure out their measurements just by looking at the card. This dragon card is so cute! ❤️
Thanks, Pam. It’s definitely up for consideration in the future. Your thoughts are very helpful!
I love the step by step instructions.
Good to hear. Hoping everyone likes this little dragon – I think he steals the show!