
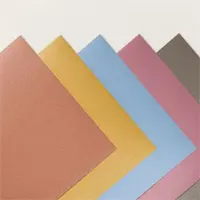
Using metallic elements for today’s thank you card produces rich results. Here’s the recipe for this luscious metallic mix: Copper Clay Luster Specialty Paper on a Gray Granite card base, Rose Gold Specialty Paper (matte) for the stems (cut with Stampin’ Up! Artistic Dies) and the rectangle layer.
WHAT I LOVE! I love how these neutrals blend together and the way shine plays against matte. Even the heat embossed THANK YOU (Phrases for All) gets “in” on the shine!

8 SIMPLE STEPS FOR IMPECCABLE HEAT EMBOSSING:
One of my favorite, favorite techniques is heat embossing. Here are 8 simple steps using the Stampin’ Up! Embossing Additions Tool Kit that will help you get the crisp and “glossy glam” results you want.
- To reduce flyaway bits of embossing powder, I swipe my Embossing Buddy across the card stock before stamping with Versamark.
- Be sure your Versamark inkpad is juicy before you ink and stamp. The embossing powder needs something to grab on to.
- Use LOTS of embossing powder. Seriously, I dump half my little embossing jar on the stamped Versamark image.
- The embossing tray is a neat and tidy “catch all” to contain the additional, loose embossing powder. Use the “funnel” feature to zip the extra back into the embossing powder jar.
- The flat brush aids in brushing away any remaining loose bits before heating.
- Let the heat tool heat up 30 seconds before starting to emboss. This also reduces flyaway bits.
- I use the long tweezer to hold the card stock steady and keep my fingers away from the heat. Side note: I also love this tweezer for placing adhesive backed gems!
- Be sure to heat long enough so that the entire image is shiny and embossed.
my simple card tutorial
CUT YOUR CARD STOCK – DIMENSIONS:
- Gray Granite Card Stock:
- Card Base – 4 1/4 x 11, scored at 5 1/2
- Punched Sentiment – 3 1/2 x 2 (before punching)
- Basic Black Card Stock:
- Layer – 3 x 4 1/4
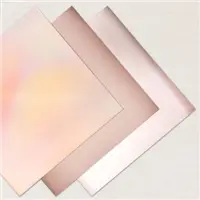
- 2023 – 2025 In Color Luster Specialty Paper (Copper Clay):
- Layer – 4 x 5 1/2
- Rose Gold 12 x 12 Specialty Paper (Matte):
- Layer – 3 x 4 1/2
- Die-Cut – 2 1/2 x 5 1/2 (before die-cutting)


GET 100+ CARD SKETCH IDEAS FREE! Subscribe to my email updates & instantly receive a FREE digital gift of 100+ Card Sketch Ideas that you can save or print! Subscribers also receive my daily card ideas and tutorials, special offers, new product releases and exclusive “subscriber-only” resources.
PROJECT TUTORIAL:
Begin by burnishing the fold of the Gray Granite card base with a Bone Folder.
Adhere the Copper Clay Luster Specialty Paper layer to the card base with Multipurpose Liquid Glue.
Adhere the Rose Gold Specialty (Matte) layer to the card, angled as shown, with Multipurpose Liquid Glue.
Adhere the Basic Black Layer to the card, angled as shown, with Stampin’ Dimensionals.

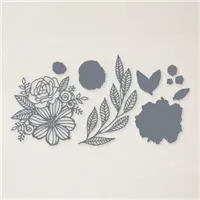
Crop the Rose Gold Specialty (Matte) piece with a Stampin’ Cut & Emboss Machine (Standard or Mini) and the Artistic stem die.
Adhere as shown with a touch of Multipurpose Liquid Glue that will be hidden behind the sentiment.
Rub the Gray Granite piece with an embossing buddy from the Embossing Additions Tool Kit.
Stamp the sentiment (Phrases for All) in Versamark Ink. Cover with black Basics Embossing Powder, set with a Heat Tool.
Crop with the Modern Oval Punch and adhere to the card as shown with Stampin’ Dimensionals.
POP OF PERSONALITY! Embellish with black Classic Matte Dots.

stampin’ up! product spotlight!


oh, so pretty card idea!


OH, SO PRETTY! The card above also showcases the Artistic Dies by Stampin’ Up! You can see the original blog post with tips and a project tutorial here.
promos, specials, & important updates


don’t forget your tulip rewards!

MY CUSTOMER EXCLUSIVE! Tulip Loyalty Rewards are my way of personally saying thank you to my frequent online shoppers. Earn a tulip for every $50 increment you spend on Stampin’ Up! products (purchased through me). Redeem tulips for a free stamp set (5 tulips) or bundle (10 tulips)!
my project supply list – click products to shop online!


Price: $11.00


Oh, my word. This card is stunning! Love the mix of metallics and neutrals.