 My friend and fellow demonstrator, Kadie Labadie, came over for a fun morning of stamping (demonstrators Patsy Waggoner and Sharon Armstrong joined me, too) and introduced me to these cute and simple Narrow Note Cards and holder. She used the Stampin’ Up! daisy punch and 1/2″ circle punch to create the darling flower for the thank you note.

STAMPIN’ PRETTY STEP-BY-STEP TUTORIAL:
NOTE CARD HOLDER:
Begin with a 5 1/2 x 8 1/2 base of card stock.
Score at 1 1/4 and 4 1/4 (long edge), flip and score at 4 1/4 and 5 1/2.
Cut the short score lines as shown to create the tabs to glue and hold together.
Fold all the score lines and assemble into the shape of the holder. Glue the tabs and ends with Multipurpose Adhesive or similar.

Decorate as desired with Designer Series Paper.
NOTE: Kadie used a retired Sale-A-Bration card kit to create her Narrow Note Card Holder with the decorative edge. TIP TO CREATE A DECORATIVE EDGE: Use the edgelit from the Be Mine Stitched Framelits Dies (or similar) to create your own custom edge to step-up the note card holder. You can see my video demonstration on using the edgelit to create a decorative edge on a Medium Envelope here.

NARROW NOTE CARDS:
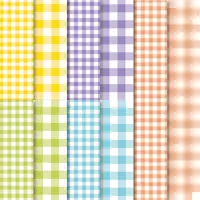
Use the Stampin’ Trimmer to cut a piece of Daffodil Delight card stock to 4 1/2 x 1 1/4. Layer and adhere a 4 1/2 x 1 piece of Gingham Gala 6×6 Designer Series Paper. Adhere to the Narrow Note Card base as shown with Snail Adhesive.
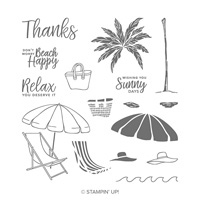
Use the Stamparatus to position and stamp the sentiment (Beach Happy) in Tuxedo Black Memento Ink (or a coordinating ink of your choice).
Use the Daisy Punch to crop a daisy in a coordinating card stock color. Adhere to the card with a Stampin’ Dimensional.
Crop a piece of coordinating card stock with the 1/2″ Circle Punch. Adhere to the center of the daisy with a Mini Glue Dot.


NEW! Available to purchase NOW. Storage by Stampin’ Up! is designed to store and showcase your Stampin’ Pads, Stampin’ Ink Refills, Stampin’ Blends, Stampin’ Write Markers, Watercolor Pencils, and other accessories. Storage by Stampin’ Up! will be also be featured in the 2019–2020 annual catalog. You can see more details here.
I love hearing from you! Please leave me your questions or comments about the project for today.

If you enjoyed this post, please be sure to . . .
- Receive a FREE PDF tutorial when you subscribe to my daily blog updates here.
- Click for my Monthly Host Code and how you can earn up to a $50 shopping spree with my Tulip Rewards Loyalty Program.
- Check out the clearance rack and save up to 70%.
- Save 10% on coordinating product bundles!
- The $99 Starter Kit is the best deal of ALL! Discounts & benefits here.
- Visit my gallery for 1000+ paper crafting ideas.
- View my FREE PDF Project Tutorials.
- Follow me on Pinterest.
- Subscribe to my YouTube paper crafting video tutorials.


My project supply list. Click products to shop on-line!


What a darling idea..I think I will do at next card group. Thanks for sharing. Liz Shields
sounds like a perfect project for your group, Liz.
The tutorial didn’t make sense to me. Do you use 2 pieces of 5.5 x 8.5? Otherwise there isn’t any place to glue the tabs!
I’m checking with Kadie to be sure the details are correct. Thanks, Crystal.
Hopefully Mary……The details below will clear up any confusion on creating this ‘Narrow Note Card Box’.
You use only 1 piece of 5-1/2″ x 8-1/2″ piece of card stock for your holder. Score that piece as you normally would score a card at 4-1/4″. Now, score at 1-1/4″ down both LONG sides of that piece of card stock. (This will start to form the sides of your box.
Then turn your card stock and score 1-1/4″ from the original 4-1/4″ center score mark you made on your 5-1/2″ x 8-1/2″ piece of card stock. (This will create the 1-1/4″ bottom section of your box)
The 2-small scored sections that are created on both the long scored sides of your card stock will be were you clip to create 2-tabs for the sides of your box. (See Mary’s diagram and instructions for that)
Hope this helps you re-create this box.
PS…….The box is sized to fit the ‘Narrow Note Cards & Envelopes perfectly.
Oh , wow , she’s so good , I love that card holder ♥️♥️♥️
Tfs
Hugs Frenchie ♥️♥️♥️♥️
I think it’s so sweet and makes an adorable gift, Frenchie.
I’m like a proud MaMa being able to see one of my projects on your blog. So happy that you (and Sharon & Patsy) liked my project. LOVE spending time with you and in your DREAMY studio.
I know I can count on you when it comes to 3-D projects. You’re an ace, Kadie.
This is so sweet and pretty! Thanks for the inspiration, Mary and Kadie!!
Always a pleasure, Michelle!
What size are the notecards? 41/2 inches by what then scored?
Hi Claudia. The narrow note cards come cut and scored (along with coordinating envelopes). The note cards measure 4 1/2 x 2 1/2 (when folded). M
I love these pretty cards and box for them. Using the decorative edgelit on the box is very clever and gives a great point of interest. Thanks for the PDF. It will go in the “need to make” file. Thanks, Kadie and Mary. Enjoy your day!
I hope to make more, too, Hilda. So glad Kadie was here to show me the way!
I love the design of this sweet note card holder and the simple cards inside. That single daisy is gorgeous – especially when paired with the Gingham Gala DSP. Love it!
Daisies and gingham = true love. Thanks, BK!
Oh Mary, what a darling and beautiful set of gift cards and holder, super easy to create and a fabulous and sweet gift to give.
Thank you and Kadie for sharing.
XO
Maria.
Thanks, Maria. Kadie is such a whiz kid when it comes to 3 D and adorable hand crafted gifts!