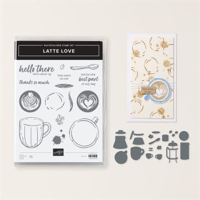
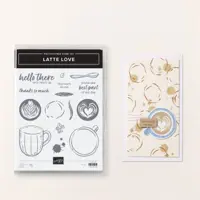
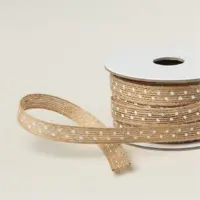
I love starting my day with a cup of coffee (usually around 4:30 a.m.) and was immediately drawn to the Stampin’ Up! A Little Latte suite collection when it was released as an on-line exclusive. Trendy and fun, the suite offers coordinating coffee themed products in Calypso Coral, Early Espresso, Lemon Lolly, Lost Lagoon, Pecan Pie, Petal Pink. Today’s card is a simple expression of friendship and includes two “latte” suite essentials that are back in stock: Adhesive-Backed Swirl Dots and Natural 3/8″ Polka Dot Trim.
Want to see more coffee themed card ideas? See my post showcasing 13 simple coffee themed cards here.
WHAT I LOVE! The Tailor Made Tags Dies (now retired) are a classy way to crop and add an interesting focus to a card. I adore the die cut dotted border and hole for adding a touch of twine or ribbon!
Watch my latest 1 Minute to WOW! Video to dive further into the Little Latte Suite and for a demonstration of the die-lovin’ A Little Latte DSP!
DON’T MISS OUT! Subscribe to my Stampin’ Pretty YouTube channel to get notified of my latest video demonstrations and product tips!
LEARN MORE TIPS & TRICKS! View ALL my Stampin’ Pretty 1 Minute to WOW! Video Tutorial shorts here.
stampin’ pretty sketch inspiration

NEED SKETCH INSPIRATION? The layout of today’s thank you card was inspired by the newest addition to my Stampin’ Pretty Sketchbook, Sketch #87 shown above!
Enjoy FREE sketch ideas with coordinating project tutorials in my Stampin’ Pretty Sketchbook here.
my simple card tutorial
CUT YOUR CARD STOCK – DIMENSIONS:
- Lemon Lolly Card Stock:
- Card Base – 4 1/4 x 11, scored at 5 1/2 (top)
- Early Espresso Card Stock:
- Layer – 3 7/8 x 5 1/8
- Strip – 1 3/4 x 4 7/8
- Basic White Card Stock
- Die-Cut Sentiment – 2 1/2 x 4 1/4 (before die-cutting)
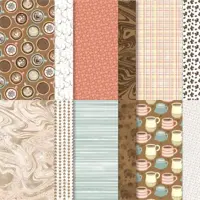
- A Little Latte Designer Series Paper:
- Heart Pattern – 3 5/8 x 4 7/8
- Cup – Cropped with coordinating dies
- Envelope Flap – 5 3/4 x 2 1/4 (before die-cutting)

PROJECT TUTORIAL:
Begin by burnishing the fold of the Lemon Lolly card base with a Bone Folder.
Layer and adhere the strip of Early Espresso, Designer Series Paper layer and Early Espresso layer together and to the card base with Multipurpose Liquid Glue as shown.
Use a Stampin’ Cut & Emboss Machine (Standard or Mini) to crop the sentiment layer using the 2 x 3 7/8 Tailor Made Tags dies. TIP: Secure in place with Post-It Tape before die-cutting.
Use a Mini Misti to stamp the sentiment (Latte Love Stamp Set) in Early Espresso Classic Ink near the top of the die-cut Basic White tag. Watch my 1 Minute to WOW video: The Magic of the Mini MISTI for a quick demonstration here.

Thread a piece of Lemon Lolly Baker’s Twine Three Color Pack through the hole of the tag and secure with a bow.
Use Paper Snips to cut and angle two pieces of Natural 3/8″ Polka Dot Trim.
Adhere to the card as shown with Mini Glue Dots.
Adhere the tag to the card with Stampin’ Dimensionals.
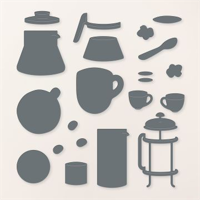
Use a Stampin’ Cut & Emboss Machine (Standard or Mini) to crop the coffee cup from A Little Latte Designer Series Paper with the coordinating Latte Love dies. Watch my 1 Minute to WOW video: Meet the Little Latte Suite for a quick demonstration here.
Adhere to the tag as shown with Stampin’ Dimensionals.

POP OF PERSONALITY! Embellish with three Pecan Pie Adhesive-Backed Swirl Dots.
PERFECT POLISH! Adhere the 5 3/4 x 2 1/4 Designer Series Paper to the Basic White Medium envelope flap with Multipurpose Liquid Glue. IMPORTANT: Add glue to the flap first, not the Designer Series Paper. Center and line up the Around the Bend curved edge die, tape to secure (Post-It Tape) and crop with a Stampin’ Cut & Emboss Machine (Standard). Watch my Stampin’ Pretty WOW Video here.

stampin’ up! product spotlight!


oh, so pretty card idea!


OH, SO PRETTY! The card above also showcases A Little Latte Suite Collection! 4 mini coffee cups in retro cool colors that coordinate with the suite. You can see the details and tutorial on my blog post here.
promos, specials, & important updates


don’t forget your tulip rewards!

MY CUSTOMER EXCLUSIVE! Tulip Loyalty Rewards are my way of personally saying thank you to my frequent online shoppers. Earn a tulip for every $50 increment you spend on Stampin’ Up! products (purchased through me). Redeem tulips for a free stamp set (5 tulips) or bundle (10 tulips)!