
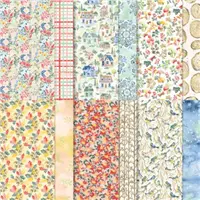
LOVE SKETCHES? Tuesday, I shared the newest addition to my Stampin’ Pretty Sketchbook, Sketch #48! Today’s card uses Rings of Love Designer Series Paper which can be earned FREE with a $50 product purchase during the Stampin’ Up! Sale-A-Bration promotion! Sale-A-Bration ends August 31 and products are only available WHILE SUPPLIES LAST!

Enjoy more sketch ideas in my Stampin’ Pretty Sketchbook here.
Click here or the button below to print or save my complete sketchbook!


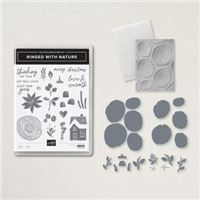
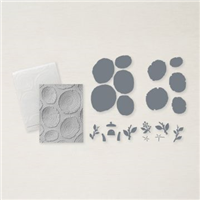
MY FAVORITE THINGS! This card uses the Rings of Love Designer Series Paper (FREE WITH $50 PURCHASE) and the COORDINATING Ringed with Nature Bundle. Both items are part of My Favorite Things from the Holiday Mini Catalog. You can see all of My Favorite Things here.

WHAT COLORS ARE IN THE DSP? Find the answers with my FREE Designer Series Papers Color Charts, available by clicking the button below.


STAMPIN’ PRETTY STEP-BY-STEP TUTORIAL:
Begin with a 4 1/4 x 5 1/2 card base of Soft Suede card stock.
Layer and adhere a 3 1/4 x 4 1/2 piece of Rings of Love Designer Series Paper to a 3 1/2 x 4 3/4 piece of Crushed Curry card stock together with Stampin’ Seal and to the card with Stampin’ Dimensionals.

With a Stampin’ Cut & Emboss Machine (Standard or Mini) crop a piece of Basic White card stock with the Stylish Shapes 2 3/4 square die.
Adhere to the card with Stampin’ Dimensionals.
With a Stampin’ Cut & Emboss Machine (Standard or Mini) crop a piece of Soft Suede card stock with the Stylish Shapes 2 3/8 square die.
Use a Paper Trimmer to cut the Soft Suede die-cut in half diagonally.
Adhere as shown with Stampin’ Seal.

With a Stampin’ Cut & Emboss Machine (Standard or Mini) crop a piece of Poppy Parade or Night of Navy card stock with the Stylish Shapes 1 3/4 circle die nestled inside the Stylish Shapes 2 3/8 square die.
Adhere over the top of a 2″ square piece of Rings of Love Designer Series Paper with the image centered in the middle.
Crop a piece of Crumb Cake card stock with the Tree Rings Hybrid Embossing Folder Die.
Tie a bow of Linen Thread.
Adhere both as shown with a Mini Glue Dot.

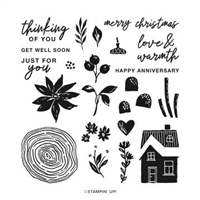
Use a Stamparatus to position and stamp the sentiment (Ringed in Nature) in Soft Suede Classic Ink onto a 1 3/4 x 1/4 piece of Basic White card stock.
Adhere to the card with snipped-to-size Stampin’ Dimensionals.
POP OF PERSONALITY! Embellish with Rustic Metallic Adhesive-Backed Dots.
 OH, SO PRETTY! The following cards also uses the Rings of Love Designer Series Paper, which I created and previously shared on my blog to help inspire you!


Mary


My project supply list. Click products to shop on-line!


OooooooMy I love that Nooms one MsMary, my fav ….. well no I’m lying I love all your Card , lol
Tfs hugs Frenchie ♥️♥️♥️♥️♥️
Love how you framed this sweet little bird and the use of splitting that square into triangles behind it…love the effect! Haha! I see you’ve used that technique recently, but that little birdie truly brought it to my attention. Funny how that happens.