

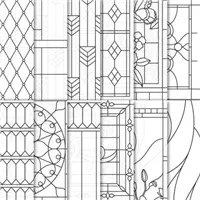
Today’s sympathy card is highlighted by beautiful new products in the Stampin’ Up! Graceful Glass suite (pp. 164-165 of the 2018-2019 Annual Catalog). The Graceful Glass 6 x 6 Designer Vellum has a black embossed pattern on one side and is gorgeous colored with Stampin’ Blends Markers on the opposite side.

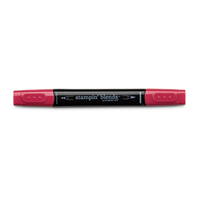
Stampin’ Blends Marker Update. ALL previously released Stampin’ Blends Marker colors are back in stock (except Pink Pirouette, which retired). The eleven NEW colors featured in the annual catalog are projected to be available in mid-June! Here’s my helpful video demonstrating the ease and coloring possibilities of Stampin’ Blends Markers.

STAMPIN’ PRETTY STEP-BY-STEP TUTORIAL:
Create a 4 1/4 x 5 1/2 card base using the Stampin’ Trimmer and Thick Whisper White card stock.
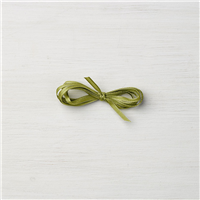
Adhere a 3 7/8 x 5 1/8 vellum pattern (Graceful Glass 6 x 6 Designer Vellum) with Multipurpose Liquid Glue to a 3 7/8 x 5 1/8 piece of Whisper White card stock. Wrap with Old Olive 1/8″ Sheer Ribbon and tie in a bow. Adhere layer to card base with Stampin’ Dimensionals.

Color the rose pattern (Graceful Glass 6 x 6 Designer Vellum) on the back (non-embossed) side with the Light Cherry Cobbler (roses) and Light Old Olive (leaves) Stampin’ Blends Markers. Cut to 1 1/4 x 4 1/4 and adhere using Multipurpose Liquid Glue to a 1 1/2 x 4 1/2 piece of Whisper White card stock. TIP: I concentrated the glue at the center of the roses to make the glue virtually invisible.
Adhere rose panel to card base as shown using Stampin’ Dimensionals.
Using the Stamparatus stamp positioning tool for crisp results and Tuxedo Black Memento Ink, stamp the sentiment from the Painted Glass stamp set on Whisper White card stock. Crop using a Big Shot, Magnetic Platform and the 4th smallest circle die from the Layering Circles Framelits Dies.

Crop scalloped circles with the Layering Circles Framelits Dies in Old Olive and Lovely Lipstick. Adhere together with Snail Adhesive. Add the sentiment circle from above with Stampin’ Dimensionals to the top of the scalloped circle layer and adhere the entire piece to the card base (Stampin’ Dimensionals only on the right to keep things even).
Enjoy my FREE PDF Step-By-Step Tutorial (and supply list) for the Graceful Glass Sympathy Card card here.
Watch this Stampin’ Up! video for more tips and ideas for using products from the Graceful Glass suite.
My card was inspired by this simple and pretty version created by Ruth Petsel (a CASE of Linda Schnabel).

I love hearing from you! Please leave me your questions or comments about the project for today.

If you enjoyed this post, please be sure to . . .
- Receive a FREE PDF tutorial when you subscribe to my daily blog updates here.
- Join My Paper Pumpkin Club and get 3 FREE PDF Tutorials with alternate projects each month.
- Click for my Monthly Host Code and how you can earn up to a $50 shopping spree with my Tulip Rewards Loyalty Program.
- Check out the clearance rack and save up to 70%.
- Save 10% on coordinating product bundles!
- The $99 Starter Kit is the best deal of ALL! Discounts & benefits here.
- Visit my gallery for 1000+ paper crafting ideas.
- View my FREE PDF Project Tutorials.
- Follow me on Pinterest.
- Subscribe to my YouTube paper crafting video tutorials.


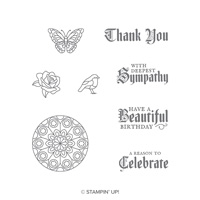
My project supply list. Click products to shop on-line!


Simply gorgeous! Painted Glass Suite was one of my first buys and still my fave! Thank you!
I absolutely love this card! This suite is definitely on my wish list. Thanks for sharing!
Thanks, Diana! I think it’s beautiful!
Just wondering how you attached your base layer of vellum without adhesive showing through?
Happy to help, Denise. I went heaviest where it would be covered by the rose panel and tiny dots where the circles are (random). Nothing shows. Multipurpose glue.
Truly beautiful elegant cards. I was dithering About getting this set but you have convinced me to do so. Thank you?
Very nice project. Your text specifies “Stampin’ Blends” markers, but your photo is of “Stampin’ Write” markers. Which did you actually use?
I used Stampin’ Blends Markers and updated the graphic. Sorry about that! For as closely as I proof my posts, I missed it! Thanks, Kathy!
Mary, What beautiful card. I love everything about it. You are so talented. Have a great day,Ellen Hinds
You always know how to make my day great, Ellen!
Love this beautiful card, Mary. Vellum is one of my favorite products and this printed vellum is on my “need” list. Great job and thanks for the tip about adding the glue to the center of the flowers. That is always a struggle for me as to where to hide it. Have a wonderful day!
I have found my “inner vellum” in the last year and really love the soft texture and shape it adds to a project. Thanks, HJ.
I wasn’t sure about the Stained Glass Vellum when I saw it in the catty…..but have to admit……It’s a game changer. SO IN LOVE with what you created my friend.
Thanks, Kadie. It’s dreamy to color with Blends!
What a gorgeous card, Mary! I love this sweet panel of flowers – beautifully colored in just the right places. Love the layout of your card, too! <3 Very comforting.
I was determined to mix a couple patterns but still keep the look simple. Thanks for stopping, Brian.
What beautiful cards Mary. Did you colour with Blends or Stampin’ Write Markers. The image used shows the markers but below in products used it shows the Blends. Guessing you could use either with great results. Love your clean and simple style Mary.
I used Stampin’ Blends Markers and updated the photo. Sorry about that confusion, Juliann, and thanks for letting me know!